
html
目录
1.1 简介
1.2 特性
1.3 四大核心
2 springboot入门案例
2.1 SpringBoot 项目开发步骤
2.2 创建一个 Spring MVC 的 Spring BootController
2.3 分析
2.4 核心配置文件格式
2.5 Spring Boot 前端使用 JSP
3 SpringBoot框架Web开发
3.1 Spring Boot 集成 MyBatis
3.2 DAO 的其它开发方式
3.3 Spring Boot 事务支持
3.4 Spring Boot 下的 Spring MVC(注解)
3.5 SpringBoot实现RESTFUL
3.6 Spring Boot 集成 Redis
1.1 简介
springboot是spring家族中的一个全新框架,用来简化spring程序的创建和开发过程。在以往我们通过SpringMVC+Spring+Mybatis框架进行开发的时候,我们需要配置web.xml,spring配置,mybatis配置,然后整合在一起,而springboot抛弃了繁琐的xml配置过程,采用大量默认的配置来简化我们的spring开发过程。
SpringBoot化繁为简,使开发变得更加的简单迅速。
1.2 特性
1.3 四大核心
** 自动配置、起步依赖、Actuator、命令行界面**
2
2.1 SpringBoot 项目开发步骤
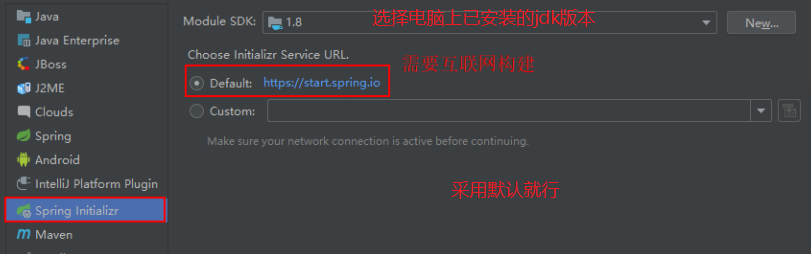
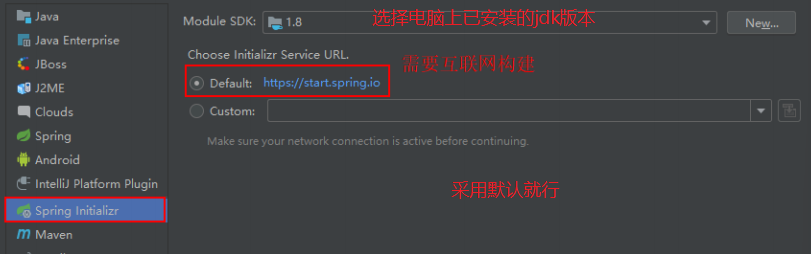
(1)创建一个 Module,选择类型为Spring Initializr 快速构建
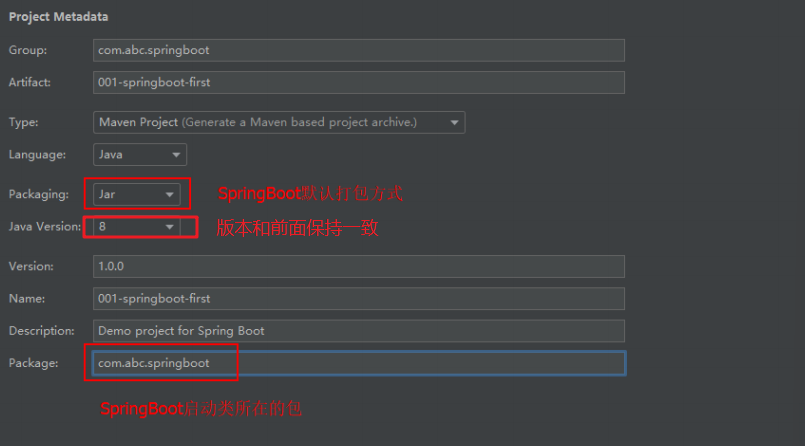
(2)设置 GAV 坐标及 pom 配置信息
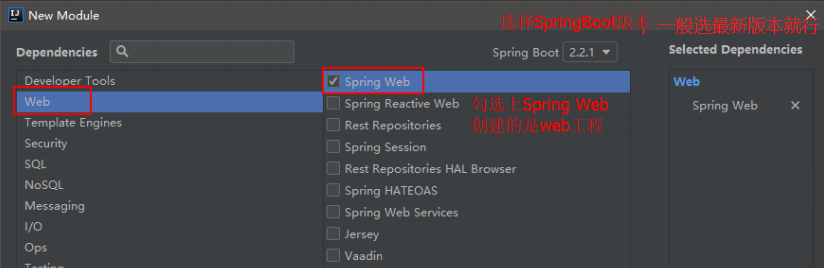
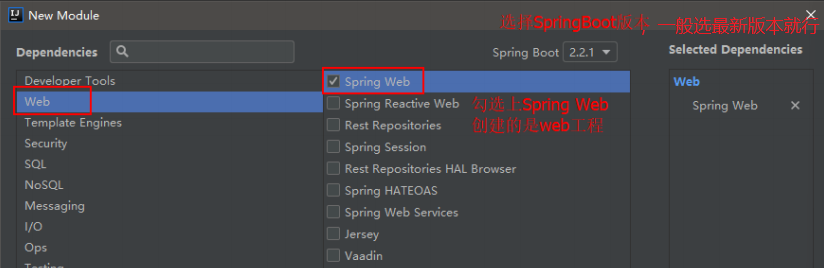
(3)选择 Spring Boot 版本及依赖
(4)设置模块名称、Content Root 路径及模块文件的目录,然后点击finish即可

(5)项目结构如下:
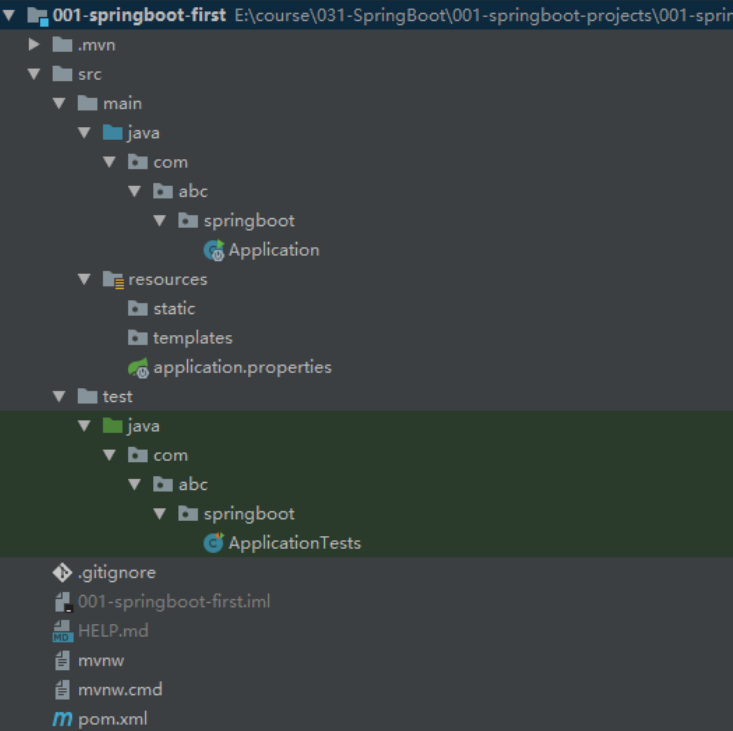
     **static** :存放静态资源。如图片、CSS、JavaScript 等
     **templates** :存放 Web 页面的模板文件
    **  application.properties/application.yml** 用于存放程序的各种依赖模块的配置信息,比如 服务端口,数据库连接配置等
   **   .gitignore**:使用版本控制工具 git 的时候,设置一些忽略提交的内容
     **Application.java** :SpringBoot 程序执行的入口,执行该程序中的 main 方法,启动当前SpringBoot项目。

    (6)对pom.xml文件进行解释

      1. <?xml version="1.0" encoding="UTF-8"?>

  2. <project xmlns="http://maven.apache.org/POM/4.0.0"

  3. xmlns:xsi="http://www.w3.org/2001/XMLSchema-instance"

  4.  xsi:schemaLocation="http://maven.apache.org/POM/4.0.0

  5. http://maven.apache.org/xsd/maven-4.0.0.xsd">

  6.  <modelVersion>4.0.0</modelVersion>

  7.  <!--继承 SpringBoot 框架的一个父项目,所有自己开发的 Spring Boot 都必须的继承-->

  8.  <parent>

  9.      <groupId>org.springframework.boot</groupId>

  10.      <artifactId>spring-boot-starter-parent</artifactId>

  11.      <version>2.2.1.RELEASE</version>

  12.      <relativePath/> <!-- lookup parent from repository -->

  13.  </parent>

  14.

  15.  <!--当前项目的 GAV 坐标-->

  16.  <groupId>com.bjpowernode.springboot</groupId>

  17.  <artifactId>002-springboot-springmvc</artifactId>

  18.  <version>1.0.0</version>

  19.

  20.  <!--maven 项目名称,可以删除-->

  21.  <name>002-springboot-springmvc</name>

  22.  <!--maven 项目描述,可以删除-->

  23.  <description>Demo project for Spring Boot</description>

  24.

  25.  <!--maven 属性配置,可以在其它地方通过${}方式进行引用-->

  26.  <properties>

  27.      <java.version>1.8</java.version>

  28.  </properties>

  29.

  30.

  31.  <dependencies>

  32.  <!--SpringBoot 框架 web 项目起步依赖,通过该依赖自动关联其它依赖,不需要我们一个一个去添加

  33. -->

  34.      <dependency>

  35.          <groupId>org.springframework.boot</groupId>

  36.          <artifactId>spring-boot-starter-web</artifactId>

  37.      </dependency>

  38.

  39.  <!--SpringBoot 框架的测试起步依赖,例如:junit 测试,如果不需要的话可以删除-->

  40.      <dependency>

  41.          <groupId>org.springframework.boot</groupId>

  42.          <artifactId>spring-boot-starter-test</artifactId>

  43.          <scope>test</scope>

  44.          <exclusions>

  45.              <exclusion>

  46.                  <groupId>org.junit.vintage</groupId>

  47.                  <artifactId>junit-vintage-engine</artifactId>

  48.              </exclusion>

  49.          </exclusions>

  50.      </dependency>

  51.  </dependencies>

  52.

  53.  <build>

  54.      <plugins>

  55.          <!--SpringBoot提供的打包编译等插件-->

  56.          <plugin>

  57.              <groupId>org.springframework.boot</groupId>

  58.              <artifactId>spring-boot-maven-plugin</artifactId>

  59.          </plugin>

  60.      </plugins>

  61.  </build>

  62. </project>
2.2 创建一个 Spring MVC 的 Spring BootController
  (1)创建SpringBootController 类

  **    注意:新创建的类一定要位于 Application 同级目录或者下级目录,否则 SpringBoot 加
载不到。 **
      1. package com.bjpowernode.springboot.web;

  2.

  3. import org.springframework.stereotype.Controller;

  4. import org.springframework.web.bind.annotation.RequestMapping;

  5. import org.springframework.web.bind.annotation.ResponseBody;

  6.

  7. @Controller

  8. public class SpringBootController {

  9.

  10.  @RequestMapping(value = "/springBoot/say")

  11.  public @ResponseBody String say() {

  12.      return "Hello,springBoot!";

  13.  }

  14. }


    (2)启动Application类中的main方法

    通过在控制台的输出,可以看到启动 SpringBoot 框架,会启动一个内嵌的 tomcat,端
口号为 8080,上下文根为空 。

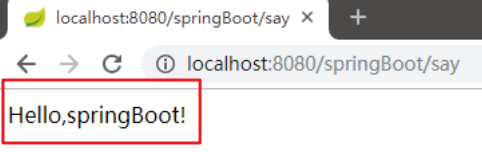
(3)在浏览器中输入 http://localhost:8080/springBoot/say进行访问
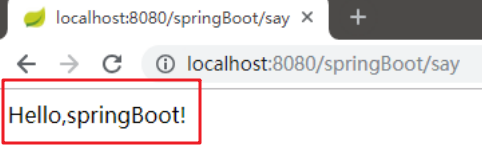
2.3 分析
(1)spring-boot-starter-parent 是一个 Springboot 的父级依赖,开发 SpringBoot 程序都需
要继承该父级项目,它用来提供相关的 Maven 默认依赖,使用它之后,常用的 jar
包依赖可以省去 version 配置
(2)Spring Boot 提供了一些默认的jar 包的依赖,可查看该父级依赖的 pom 文件
(3)如果不想使用某个默认的依赖版本,可以通过 pom.xml 文件的属性配置覆盖各个
依赖项,比如覆盖 Spring 版本:
      1.  <properties>

  2.      <spring-framework.version>5.0.0.RELEASE</ spring-framework.version >

  3.  </properties>


    (4) **  @SpringBootApplication** 注解是 Spring Boot 项目的核心注解,主要作用是 **开启
Spring 自动配置**,如果在 Application 类上去掉该注解,那么不会启动 SpringBoot程序
(5)main 方法是一个标准的 Java 程序的 main 方法,是boot项目启动运行的入口
(6) @Controller 及 @ResponseBody 依然是我们之前的 Spring MVC,因为 Spring Boot
的里面依然是使用我们的 Spring MVC + Spring + MyBatis 等框架
2.4 核心配置文件格式
(1).properties 文件(默认采用该文件)
通过修改 application.properties 配置文件,修改默认 tomcat 端口号及项目上下文件根:
      1. #设置内嵌 Tomcat 端口号

  2. server.port=9090

  3.

  4. #配置项目上下文根

  5. server.servlet.context-path=/003-springboot-port-context-path
页面显示结果:

    (2) .yml 文件 :

    项目名称:004-springboot-yml

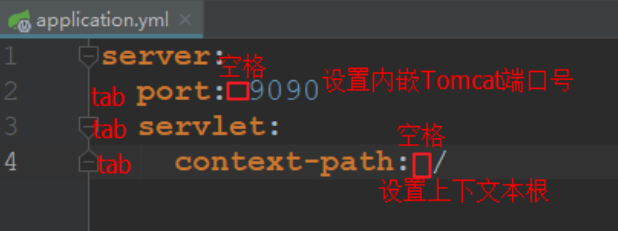
    yml 是一种 yaml 格式的配置文件,主要采用一定的空格、换行等格式排版进行配置。它能够直观的被计算机识别数据序列化格式,容易被人类阅读,yaml 类似于 xml,但是语法比 xml 简洁很多,值与前面的冒号配置项必须要有一个空格, yml 后缀也可以使用 yaml 后缀 。
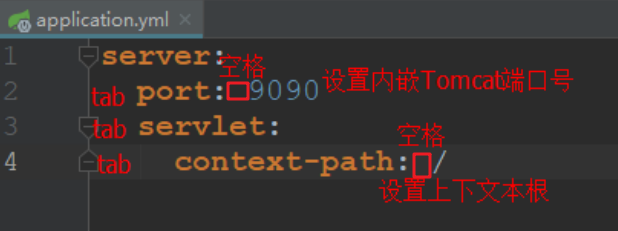
    **  注意:当两种格式配置文件同时存在时,使用的是.properties 配置文件。**

    (3)多环境配置( **.properties方式** )

    在实际开发的过程中,我们的项目会经历很多的阶段(开发->测试->上线),每个阶段
的配置也会不同,例如:端口、上下文根、数据库等,那么这个时候 为了方便在不同的环境
之间切换,SpringBoot 提供了多环境配置,具体步骤如下 :
项目名称:005-springboot-multi-environment
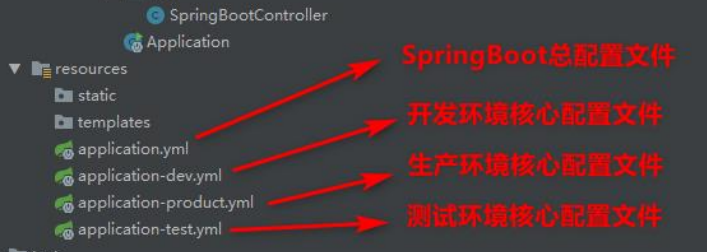
为每个环境创建一个配置文件,命名必须为 application-环境标识.properties|yml
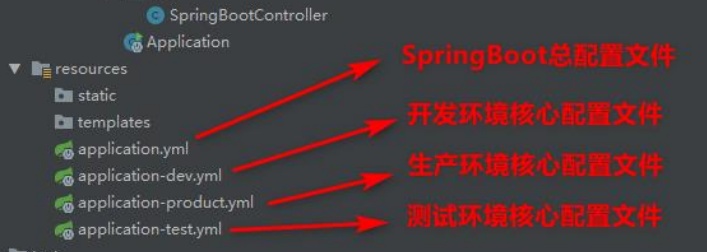
** application-dev.properties **
      1. #开发环境

  2.

  3. #设置内嵌 Tomcat 默认端口号

  4. server.port=8080

  5.

  6. #设置项目的上下文根

  7. server.servlet.context-path=/005-springboot-multi-environment-dev
application-product.properties
      1. #生产环境

  2.

  3. #配置内嵌 Tomcat 默认端口号

  4. server.port=80

  5.

  6. #配置项目上下文根

  7. server.servlet.context-path=/005-springboot-multi-environment-product
application-test.properties
      1. #测试环境

  2.

  3. #配置内嵌 Tomcat 端口号

  4. server.port=8081

  5.

  6. #配置项目的上下文根

  7. server.servlet.context-path=/005-springboot-multi-environment-test
在总配置文件 application.properties 进行环境的激活
      1. #SpringBoot 的总配置文件

  2.

  3. #激活开发环境

  4. #spring.profiles.active=dev

  5.

  6. #激活测试环境

  7. #spring.profiles.active=test

  8.

  9. #激活生产环境

  10. spring.profiles.active=product


    (4)多环境配置( **.yml方式** )
** application-dev.yml**
      1. #设置开发环境配置

  2.

  3. server:

  4.  port: 8080 #设置 Tomcat 内嵌端口号

  5.  servlet:

  6.   context-path: /dev #设置上下文根
application-product.yml
      1. #设置生产环境配置

  2.

  3. server:

  4.  port: 80

  5.  servlet:

  6.   context-path: /product
application-test.yml
      1. #设置测试环境配置

  2.

  3. server:

  4.  port: 9090

  5.  servlet:

  6.   context-path: /test
在总配置文件 application.yml进行环境的激活
      1. #springboot 总配置文件

  2.

  3. #激活开发环境

  4. #spring:

  5. # profiles:

  6. #  active: dev

  7.

  8.

  9. #激活测试环境

  10. #spring:

  11. # profiles:

  12. #  active: test

  13.

  14. #激活生产环境

  15. spring:

  16.  profiles:

  17.   active: product


    (5)Spring Boot 自定义配置

    在 SpringBoot 的核心配置文件中,除了使用内置的配置项之外,我们还可以在自定义配
置,然后采用如下注解去读取配置的属性值:
**(A)@Value注解 用于逐个读取application.properties中的配置**
** 案例演示:**
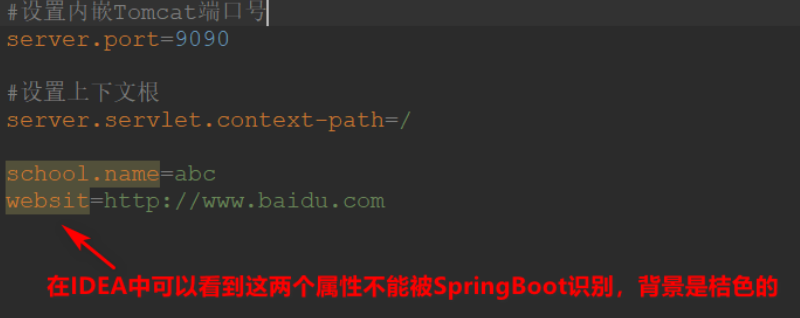
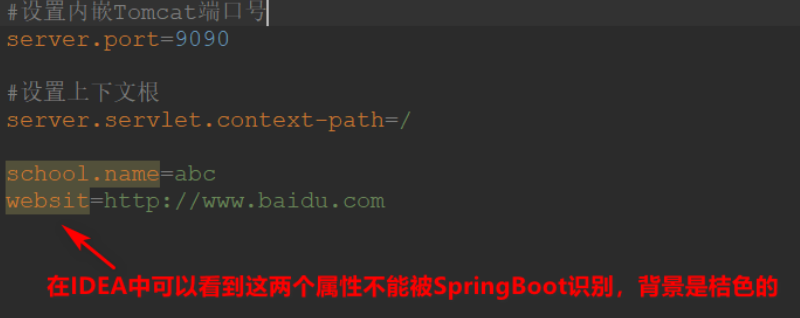
** (1) **在核心配置文件 applicatin.properties 中,添加两个自定义配置项 school.name 和
website。在 IDEA 中可以看到这两个属性不能被 SpringBoot 识别,背景是桔色的 :
.properties方式
** .yml方式**
      1. #设置端口号及上下文根

  2. server:

  3.  port: 9090

  4.  servlet:

  5.   context-path: /

  6.

  7. school:

  8.  name: ssm

  9. websit: http://www.baidu.com


    (2)在 SpringBootController 中定义属性,并使用@Value 注解或者自定义配置值,并对其方法进行测试

      1. @Controller

  2. public class SpringBootController {

  3.

  4.  @Value("${school.name}")

  5.  private String schoolName;

  6.

  7.  @Value("${websit}")

  8.  private String websit;

  9.

  10.  @RequestMapping(value = "/springBoot/config")

  11.  public @ResponseBody String say() {

  12.  return schoolName + "------" + websit;

  13.  }

  14. }


    (3)重新运行 Application,在浏览器中进行测试
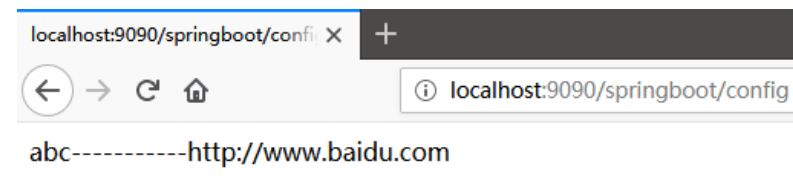
      **(B)@ConfigurationProperties**

   **   作用:**将整个文件映射成一个对象,用于自定义配置项比较多的情况 。

    **案例演示:**
** (1)**在 com.abc.springboot.config 包下创建 ConfigInfo 类,并为该类加上 Component
和
ConfigurationProperties 注解,并在 ConfigurationProperties 注解中添加属性 prefix,可以区分同名配置
。
      1. @Data

  2. @Component

  3. @ConfigurationProperties(prefix = "school")

  4. public class ConfigInfo {

  5.

  6.  private String name;

  7.

  8.  private String websit;

  9. }
** (2)application.properties 配置文件**
      1. #设置内嵌 Tomcat 端口号

  2. server.port=9090

  3.

  4. #设置上下文根

  5. server.servlet.context-path=/config

  6.

  7. school.name=ssm

  8. school.websit=http://www.baidu.com


    (3)在 SpringBootController 中注入 ConfigInfo 配置类

      1. @Autowired

  2. private ConfigInfo configInfo;


    (4)修改 SpringBootController 类中的测试方法

      1. @RequestMapping(value = "/springBoot/config")

  2. public @ResponseBody String say() {

  3.  return configInfo.getName() + "=======" + configInfo.getWebsit();

  4. }


    (5)重新运行 Application,在浏览器中进行测试
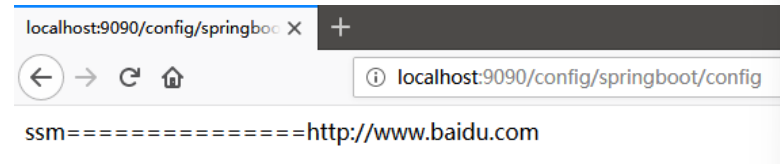
      **(C)警告解决**

    在 ConfigInfo 类中使用了 ConfigurationProperties 注解后,IDEA 会出现一个警告,不影响程序的执行。

    点击 open documentnation 跳转到网页,在网页中提示需要加一个依赖,我们将这
个依赖拷贝,粘贴到 pom.xml 文件中 即可。
      1. <!--解决使用@ConfigurationProperties 注解出现警告问题-->

  2. <dependency>

  3.   <groupId>org.springframework.boot</groupId>

  4.   <artifactId>spring-boot-configuration-processor</artifactId>

  5.   <optional>true</optional>

  6. </dependency>


    **(D)中文乱码**

如果在 SpringBoot 核心配置文件中有中文信息,会出现乱码:

2.5 Spring Boot 前端使用 JSP
     (1)在 pom.xml 文件中配置以下依赖项

      1. <!--引入 Spring Boot 内嵌的 Tomcat 对 JSP 的解析包,不加解析不了 jsp 页面-->

  2. <!--如果只是使用 JSP 页面,可以只添加该依赖-->

  3. <dependency>

  4.  <groupId>org.apache.tomcat.embed</groupId>

  5.  <artifactId>tomcat-embed-jasper</artifactId>

  6. </dependency>

  7.

  8. <!--如果要使用 servlet 必须添加该以下两个依赖-->

  9. <!-- servlet 依赖的 jar 包-->

  10. <dependency>

  11.  <groupId>javax.servlet</groupId>

  12.  <artifactId>javax.servlet-api</artifactId>

  13. </dependency>

  14. <dependency>

  15.  <groupId>javax.servlet.jsp</groupId>

  16.  <artifactId>javax.servlet.jsp-api</artifactId>

  17.  <version>2.3.1</version>

  18. </dependency>

  19.

  20. <!--如果使用 JSTL 必须添加该依赖-->

  21. <!--jstl 标签依赖的 jar 包 start-->

  22. <dependency>

  23.  <groupId>javax.servlet</groupId>

  24.  <artifactId>jstl</artifactId>

  25. </dependency>


    (2)在 pom.xml 的 build 标签中要配置以下信息
    SpringBoot 要求 jsp 文件必须编译到指定的 META-INF/resources 目录下才能访问,否则
访问不到。其实官方已经更建议使用模板技术。
      1. <!--

  2.  SpringBoot 要求 jsp 文件必须编译到指定的 META-INF/resources 目录下才能访问,否则访问

  3. 不到。

  4.  其它官方已经建议使用模版技术

  5. -->

  6. <resources>

  7.  <resource>

  8.      <!--源文件位置-->

  9.      <directory>src/main/webapp</directory>

  10.      <!--指定编译到 META-INF/resources,该目录不能随便写-->

  11.      <targetPath>META-INF/resources</targetPath>

  12.      <!--指定要把哪些文件编译进去,**表示 webapp 目录及子目录,*.*表示所有文件-->

  13.      <includes>

  14.          <include>**/*.*</include>

  15.      </includes>

  16.  </resource>

  17. </resources>


    (3)在 application.properties 文件配置 Spring MVC 的视图展示为jsp,这里相当于 Spring MVC 的配置。

      1. #SpringBoot 核心配置文件

  2. #指定内嵌 Tomcat 端口号

  3. server.port=8090

  4.

  5. #配置 SpringMVC 视图解析器

  6. #其中:/ 表示目录为 src/main/webapp

  7. spring.mvc.view.prefix=/

  8. spring.mvc.view.suffix=.jsp


    (4)在 com.abc.springboot.controller 包下创建 JspController 类

      1. @Controller

  2. public class SpringBootController {

  3.

  4.  @RequestMapping(value = "/springBoot/jsp")

  5.  public String jsp(Model model) {

  6.

  7.      model.addAttribute("data","SpringBoot 前端使用 JSP 页面!");

  8.

  9.  return "index";

  10.  }

  11. }


    (5)在 src/main 下创建一个 webapp 目录,然后在该目录下新建index.jsp 页面

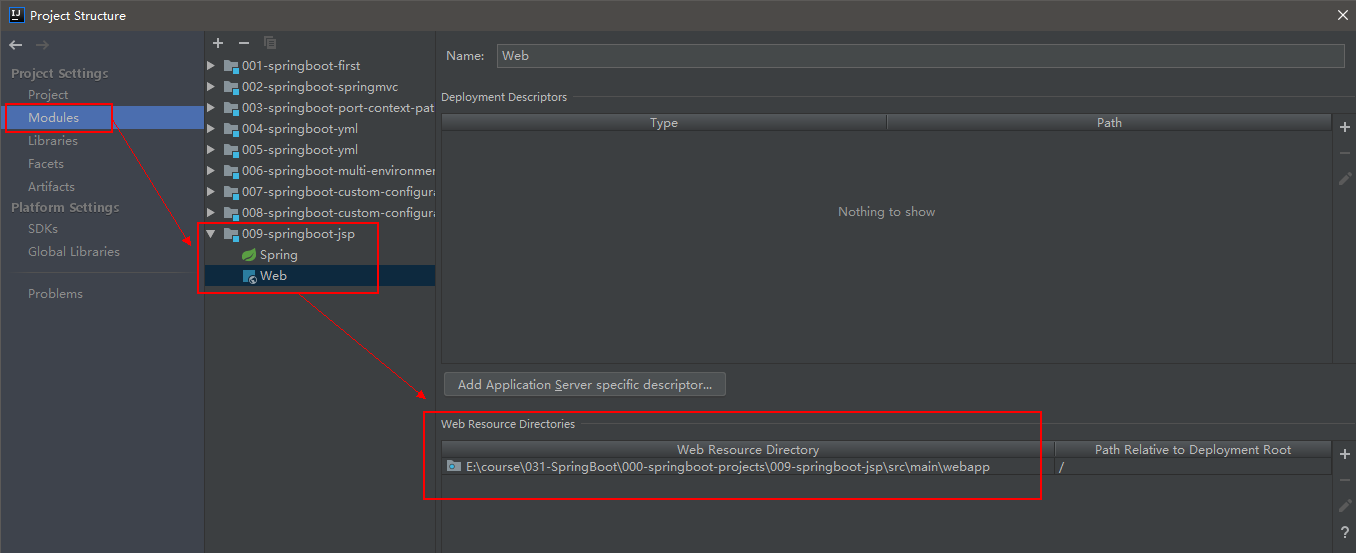
    注意: 如果在webapp目录下右键,没有创建jsp的选项,可以在Project Structure中指定webapp为 Web Resource Directory 。
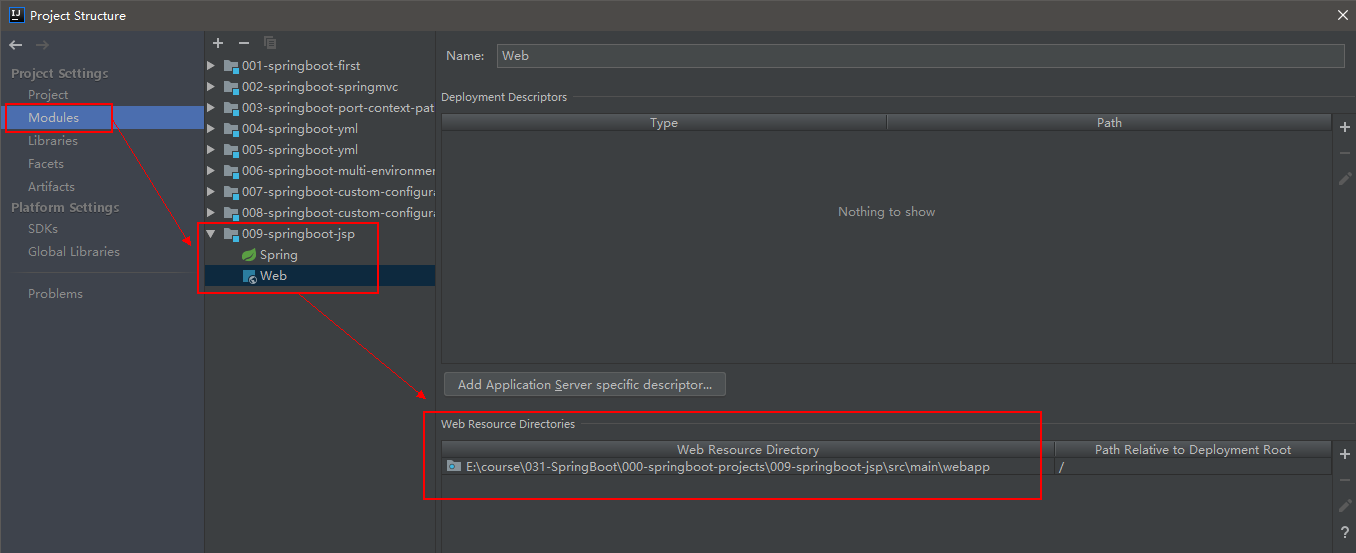
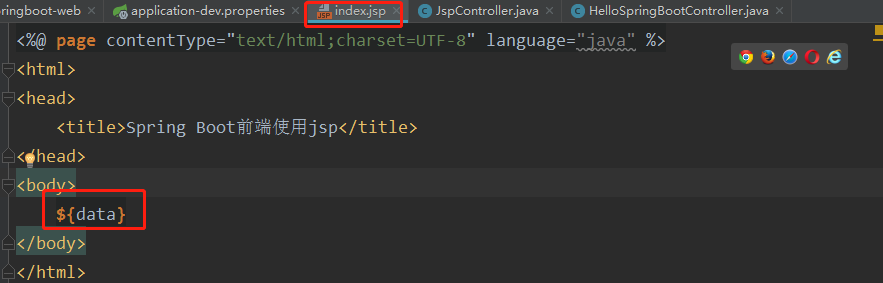
(6)在 index.jsp 中获取 Controller 传递过来的数据
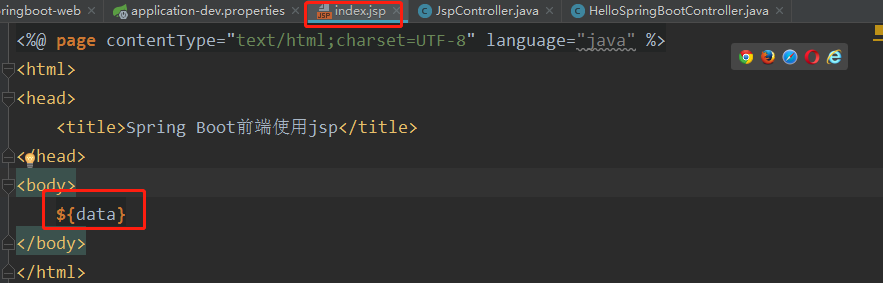
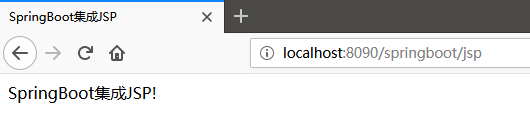
(7)重新运行 Application,通过浏览器访问测试
3 SpringBoot框架Web开发
通过实际代码案例进行梳理:
3.1 Spring Boot 集成 MyBatis
通过 SpringBoot +MyBatis 实现对数据库学生表的查询操作的实现步骤:
(1)创建新的数据库springboot并向表中插入数据
(2)创建一个新的 SpringBoot 的 Module
创建项目的过程省略
(3)在 pom.xml 中添加相关 jar 依赖
      1. <!--MyBatis 整合 SpringBoot 的起步依赖-->

  2. <dependency>

  3.  <groupId>org.mybatis.spring.boot</groupId>

  4.  <artifactId>mybatis-spring-boot-starter</artifactId>

  5.  <version>2.0.0</version>

  6. </dependency>

  7.

  8. <!--MySQL 的驱动依赖-->

  9. <dependency>

  10.  <groupId>mysql</groupId>

  11.  <artifactId>mysql-connector-java</artifactId>

  12. </dependency>
(4)在 Springboot 的核心配置文件 application.properties 中配置数据源
      1. #配置内嵌 Tomcat 端口号

  2. server.port=9090

  3.

  4. #配置项目上下文根

  5. server.servlet.context-path=/010-springboot-web-mybatis

  6.

  7. #配置数据库的连接信息

  8. #注意这里的驱动类有变化

  9. spring.datasource.driver-class-name=com.mysql.cj.jdbc.Driver

  10. spring.datasource.url=jdbc:mysql://localhost:3306/springboot?useUnicode=true&characterEncoding=UTF-8&useJDBCCompliantTimezoneShift=true&useLegacyDatetimeCode=false&serverTimezone=GMT%2B8

  11.

  12. spring.datasource.username=root

  13. spring.datasource.password=root
(5)开发代码(代码生成器)
使用 Mybatis 反向工程生成接口、映射文件以及实体 bean,具体步骤参见附录 1
     (A)在 web 包下创建 StudentController 并编写代码

      1. @Controller

  2. public class StudentController {

  3.

  4.  @Autowired

  5.  private StudentService studentService;

  6.

  7.  @RequestMapping(value = "/springBoot/student")

  8.  public @ResponseBody Object student() {

  9.

  10.  Student student = studentService.queryStudentById(1);

  11.

  12.  return student;

  13.  }

  14. }


    (B)在 service 包下创建 service 接口并编写代码

      1. public interface StudentService {

  2.

  3.  /**

  4.  * 根据学生标识获取学生详情

  5.  * @param id

  6.  * @return

  7.  */

  8.  Student queryStudentById(Integer id);

  9. }


    (C)在 service.impl 包下创建 service 接口并编写代码

      1. @Service

  2. public class StudentServiceImpl implements StudentService {

  3.

  4.

  5.  @Autowired

  6.  private StudentMapper studentMapper;

  7.

  8.  @Override

  9.  public Student queryStudentById(Integer id) {

  10.  return studentMapper.selectByPrimaryKey(id);

  11.  }

  12. }


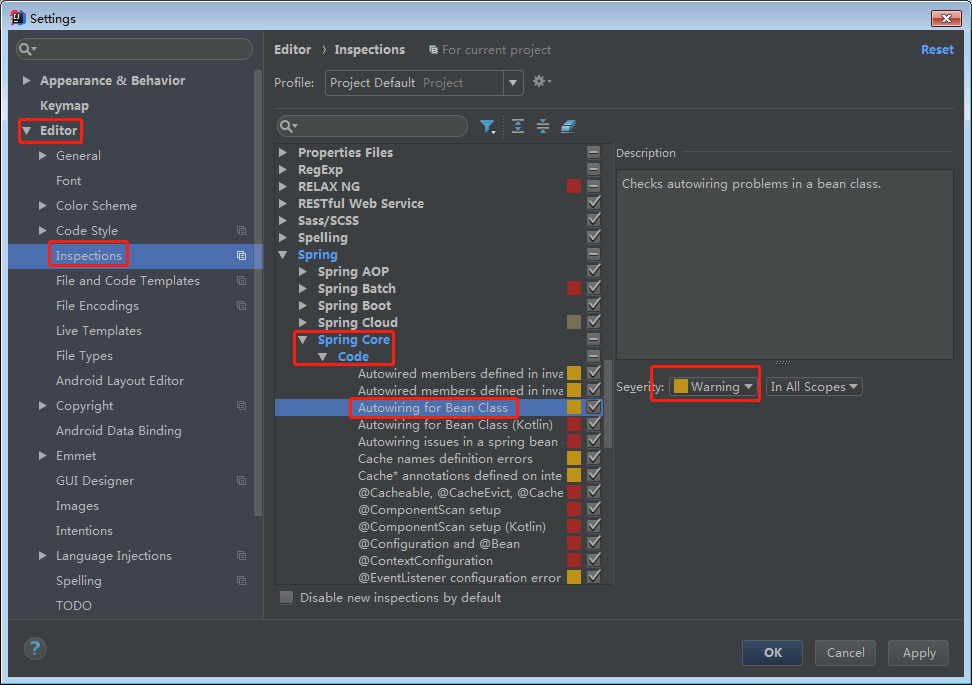
    (D)如果在 web 中导入 service 存在报错,可以尝试进行如下配置解决
(E) 在 Mybatis 反向工程生成的 StudentMapper 接口上加一个 Mapper 注解
@Mapper 作用:mybatis 自动扫描数据持久层的映射文件及 DAO 接口的关系
      1. @Mapper

  2. public interface StudentMapper {

  3. }


    (F)默认情况下,Mybatis 的 xml 映射文件不会编译到 target 的 class 目录下,所
以我们需要在 pom.xml 文件中配置 resource 。
      1. <resources>

  2.  <resource>

  3.  <directory>src/main/java</directory>

  4.  <includes>

  5.      <include>**/*.xml</include>

  6.  </includes>

  7.  </resource>

  8. </resources>


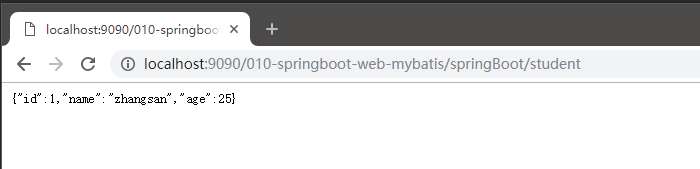
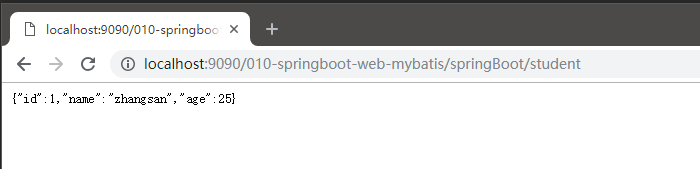
    (G)启动 Application 应用,浏览器访问测试运行
3.2 DAO 的其它开发方式
方式一:
(A)注释掉 StudentMapper 接口上的@Mapper 注解

(B)在运行的主类上添加注解包扫描MapperScan("com.abc.springboot.mapper")
      1. @SpringBootApplication

  2. @MapperScan("com.abc.springboot.mapper")

  3. public class Application {
或
      1. @SpringBootApplication

  2. //Mybatis 提供的注解:扫描数据持久层的 mapper 映谢配置文件,DAO 接口上就不用加@Mapper

  3. //basePackages 通常指定到数据持久层包即可

  4. @MapperScan(basePackages = "com.abc.springboot.mapper")

  5. public class Application {
方式二:
因为 SpringBoot 不能自动编译接口映射的 xml 文件,还需要手动在 pom 文件中指定,
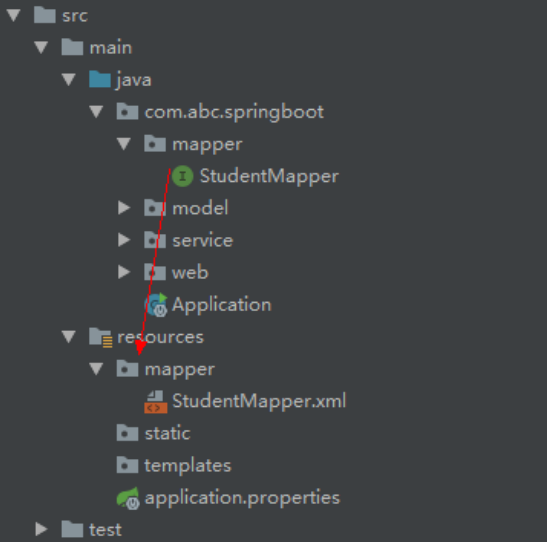
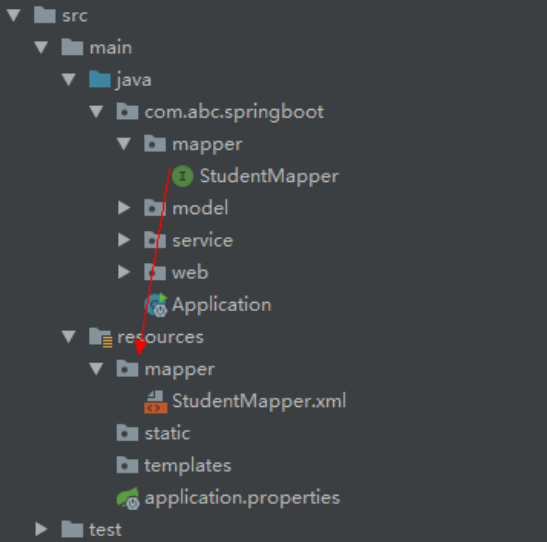
所以有的公司直接将映射文件直接放到 resources 目录下 ,在 resources 目录下新建目录 mapper 存放映射文件,将 StudentMapper.xml 文件移到resources/mapper 目录下:
在 **application.properties 配置文件中指定映射文件的位置** ,这个配置只有接口和映
射文件不在同一个包的情况下,才需要指定:
      1. # 指定 Mybatis 映射文件的路径

  2. mybatis.mapper-locations=classpath:mapper/*.xml
3.3 Spring Boot 事务支持
springboot事务底层依然采用的是 Spring 本身提供的事务管理。
   在上述案例的基础上,通过 SpringBoot +MyBatis 实现对数据库学生表的更新操作,在 service 层的方法中构建异常,查看事务是否生效:

    (1)在 StudentController 中添加更新学生的方法

      1. @RequestMapping(value = "/springboot/modify")

  2. public @ResponseBody Object modifyStudent() {

  3.

  4.  int count = 0;

  5.  try {

  6.  Student student = new Student();

  7.  student.setId(1);

  8.  student.setName("Jack");

  9.  student.setAge(33);

  10.  count = studentService.modifyStudentById(student);

  11.  } catch (Exception e) {

  12.  e.printStackTrace();

  13.  return "fail";

  14.  }

  15.

  16.  return count;

  17. }


    (2)在 StudentService 接口中添加更新学生方法


int modifyStudentById(Student student);


    (3)在 StudentServiceImpl 接口实现类中对更新学生方法进行实现,并构建一个异常,同时在该方法上加@Transactional 注解。

      1. @Override

  2. @Transactional //添加此注解说明该方法添加的事务管理

  3. public int update(Student student) {

  4.

  5.  int updateCount = studentMapper.updateByPrimaryKeySelective(student);

  6.

  7.  System.out.println("更新结果:" + updateCount);

  8.

  9.  //在此构造一个除数为 0 的异常,测试事务是否起作用

  10.  int a = 10/0;

  11.

  12.  return updateCount;

  13. }


    (4)在Application类上加@EnableTransactionManagement开启事务支持。
@EnableTransactionManagement 可选,但是业务方法上必须添加@Transactional 事务才生效
      1. @SpringBootApplication

  2. @MapperScan(basePackages = "com.abc.springboot.mapper")

  3. @EnableTransactionManagement //开启事务支持(可选项,但@Transactional 必须添加)

  4. public class Application {
3.4 Spring Boot 下的 Spring MVC(注解)
springboot下的springMVC主要有以下注解:
    (1)@Controller:Spring MVC 的注解,处理 http 请求

    (2)@RestController :@Controller 与@ResponseBody 的组合注解

    如果一个 Controller 类添加了@RestController,那么该 Controller 类下的所有方法都相当
于添加了@ResponseBody 注解 , 用于返回字符串或json数据。
创建 MyRestController 类,演示@RestController 替代@Controller + @ResponseBody
      1. @RestController

  2. public class MyRestController {

  3.  @Autowired

  4.  private StudentService studentService;

  5.

  6.  @RequestMapping("/boot/stu")

  7.  public Object stu(){

  8.  return studentService.getStudentById(1);

  9.  }

  10. }


    (3)@RequestMapping:支持 Get 请求,也支持 Post 请求 。
    (4)@GetMapping :只支持 Get 请求,主要用于查询操作。

    (5)@PostMapping:只支持Post请求,主要用于新增数据。

    (6)@PutMapping:只支持put请求,主要用于修改数据

    (7)@DeleteMapping:只支持delete请求,通常用与删除数据

    **(8)综合案例:**
**(A)创建一个 MVCController,里面使用上面介绍的各种注解接收不同的请求 **
      1. //RestController 注解相当于加了给方法加了@ResponseBody 注解,所以是不能跳转页面的,只能返回字符串或者 json 数据

  2. @RestController

  3. public class MVCController {

  4.

  5.  @GetMapping(value = "/query")

  6.  public String get() {

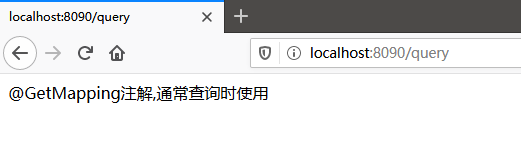
  7.  return "@GetMapping 注解,通常查询时使用";

  8.  }

  9.

  10.

  11.  @PostMapping(value = "/add")

  12.  public String add() {

  13.  return "@PostMapping 注解,通常新增时使用";

  14.  }

  15.

  16.  @PutMapping(value = "/modify")

  17.  public String modify() {

  18.  return "@PutMapping 注解,通常更新数据时使用";

  19.  }

  20.

  21.  @DeleteMapping(value = "/remove")

  22.  public String remove() {

  23.  return "@DeleteMapping 注解,通常删除数据时使用";

  24.  }

  25. }
(B)启动应用,在浏览器中输入不同的请求进行测试
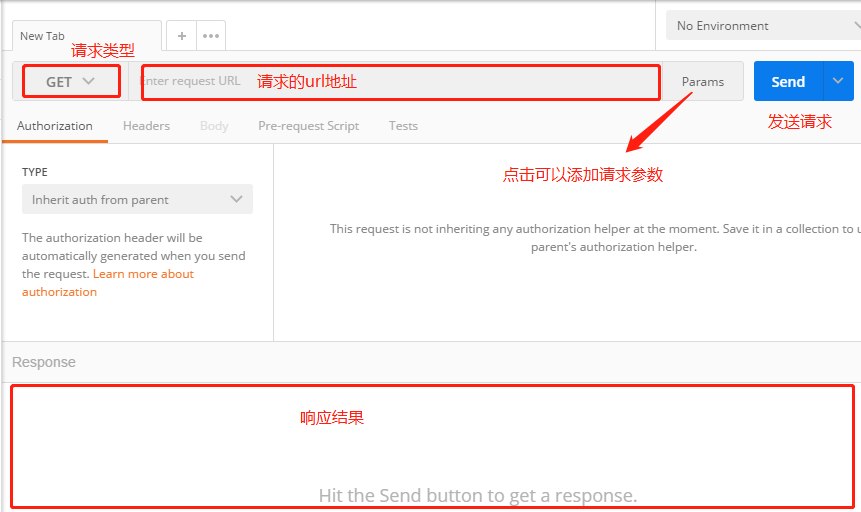
(C)结合POSTMan工具测试其他请求类型
3.5 SpringBoot实现RESTFUL
    **(1)简介**

    它是一种互联网软件设计的风格,它只是提出了一组客户端和服务器交互时的架构理念和设计原则,基于这种理念和原则设计的接口可以更简洁,更有层次。
比如我们要访问一个 http 接口:http://localhost:8080/boot/order?id=1021&status=1
采用 RESTFul 风格则 http 地址为:http://localhost:8080/boot/order/1021/1
**(2)开发RESTFUL*
(3)案例:使用 RESTful 风格模拟实现对学生的增删改查操作
该项目集成了 MyBatis、spring、SpringMVC,通过模拟实现对学生的增删改查操作
pom.xml文件
      1. <dependencies>

  2.  <!--SpringBoot 框架 web 项目起步依赖-->

  3.  <dependency>

  4.      <groupId>org.springframework.boot</groupId>

  5.      <artifactId>spring-boot-starter-web</artifactId>

  6.  </dependency>

  7.

  8.  <!--MyBatis 集成 SpringBoot 框架起步依赖-->

  9.  <dependency>

  10.      <groupId>org.mybatis.spring.boot</groupId>

  11.      <artifactId>mybatis-spring-boot-starter</artifactId>

  12.      <version>2.0.1</version>

  13.  </dependency>

  14.  <!--MySQL 驱动-->

  15.  <dependency>

  16.      <groupId>mysql</groupId>

  17.      <artifactId>mysql-connector-java</artifactId>

  18.  </dependency>

  19. </dependencies>

  20.

  21. <build>

  22.  <!--指定配置资源的位置-->

  23.  <resources>

  24.      <resource>

  25.          <directory>src/main/java</directory>

  26.          <includes>

  27.              <include>**/*.xml</include>

  28.          </includes>

  29.      </resource>

  30.  </resources>

  31.

  32.  <plugins>

  33.      <!--mybatis 代码自动生成插件-->

  34.      <plugin>

  35.          <groupId>org.mybatis.generator</groupId>

  36.          <artifactId>mybatis-generator-maven-plugin</artifactId>

  37.          <version>1.3.6</version>

  38.          <configuration>

  39.              <!--配置文件的位置-->

  40.              <configurationFile>GeneratorMapper.xml</configurationFile>

  41.              <verbose>true</verbose>

  42.              <overwrite>true</overwrite>

  43.          </configuration>

  44.      </plugin>

  45.

  46.      <plugin>

  47.          <groupId>org.springframework.boot</groupId>

  48.          <artifactId>spring-boot-maven-plugin</artifactId>

  49.      </plugin>

  50.  </plugins>

  51. </build>
application. properties核心配置文件
      1. #配置内嵌 Tomcat 端口号

  2. server.port=8090

  3.

  4. #配置项目上下文根

  5. server.servlet.context-path=/

  6.

  7. #配置数据库的连接信息

  8. #注意这里的驱动类有变化

  9. spring.datasource.driver-class-name=com.mysql.cj.jdbc.Driver

  10. spring.datasource.url=jdbc:mysql://localhost:3306/springboot?useUnicode=true&characterEncoding=UTF-8&useJDBCCompliantTimezoneShift=true&useLegacyDatetimeCode=false&serverTimezone=GMT%2B8

  11.

  12. spring.datasource.username=root

  13. spring.datasource.password=root
通过逆向工程生成 DAO

创建 RESTfulController
      1. @RestController

  2. public class RESTfulController {

  3.

  4.  /**

  5.  * 添加学生

  6.  * 请求地址:

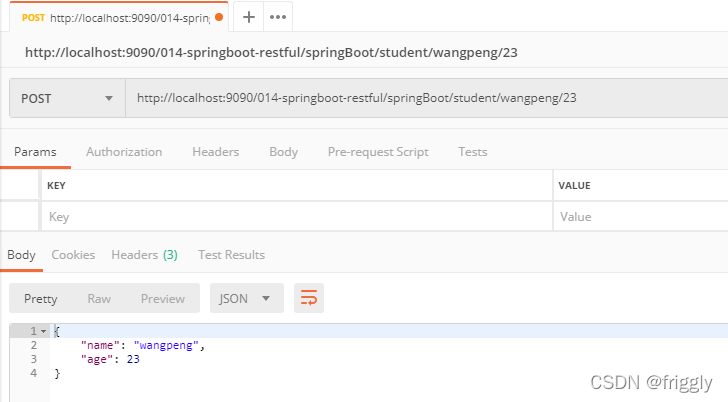
  7. http://localhost:9090/014-springboot-restful/springBoot/student/wangpeng/23

  8.  * 请求方式:POST

  9.  * @param name

  10.  * @param age

  11.  * @return

  12.  */

  13.  @PostMapping(value = "/springBoot/student/{name}/{age}")

  14.  public Object addStudent(@PathVariable("name") String name, @PathVariable("age") Integer age) {

  15.

  16.  Map<String,Object> retMap = new HashMap<String, Object>();

  17.  retMap.put("name",name);

  18.  retMap.put("age",age);

  19.

  20.

  21.  return retMap;

  22.  }

  23.

  24.  /**

  25.  * 删除学生

  26.  * 请求地址:

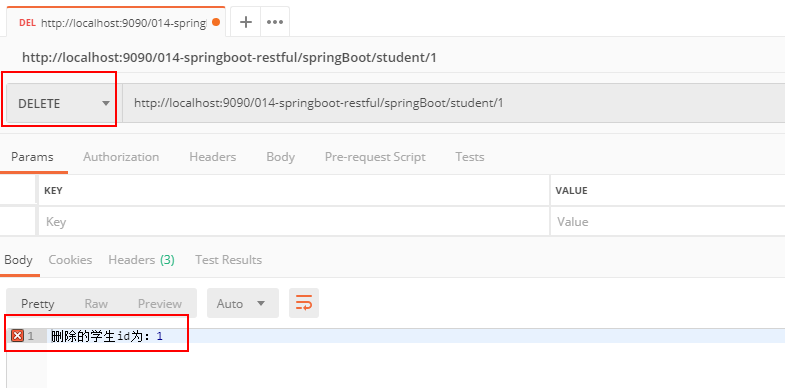
  27. http://localhost:9090/014-springboot-restful/springBoot/student/1

  28.  * 请求方式:Delete

  29.  * @param id

  30.  * @return

  31.  */

  32.  @DeleteMapping(value = "/springBoot/student/{id}")

  33.  public Object removeStudent(@PathVariable("id") Integer id) {

  34.

  35.  return "删除的学生 id 为:" + id;

  36.  }

  37.

  38.  /**

  39.  * 修改学生信息

  40.  * 请求地址:

  41. http://localhost:9090/014-springboot-restful/springBoot/student/2

  42.  * 请求方式:Put

  43.  * @param id

  44.  * @return

  45.  */

  46.  @PutMapping(value = "/springBoot/student/{id}")

  47.  public Object modifyStudent(@PathVariable("id") Integer id) {

  48.

  49.  return "修改学生的 id 为" + id;

  50.  }

  51.

  52.  @GetMapping(value = "/springBoot/student/{id}")

  53.  public Object queryStudent(@PathVariable("id") Integer id) {

  54.

  55.  return "查询学生的 id 为" + id;

  56.  }

  57. }
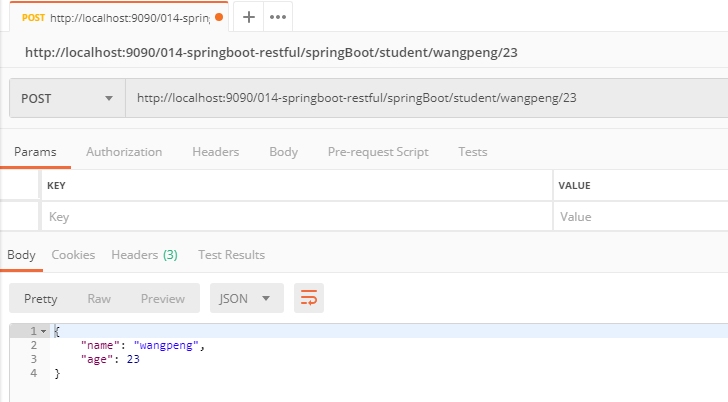
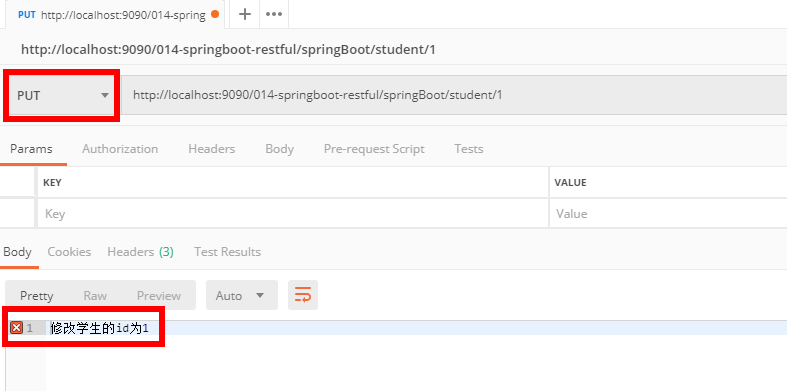
使用 Postman 模拟发送请求,进行测试 :
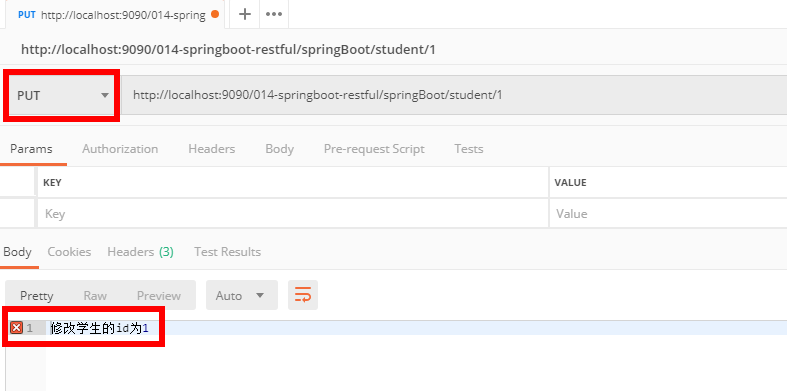
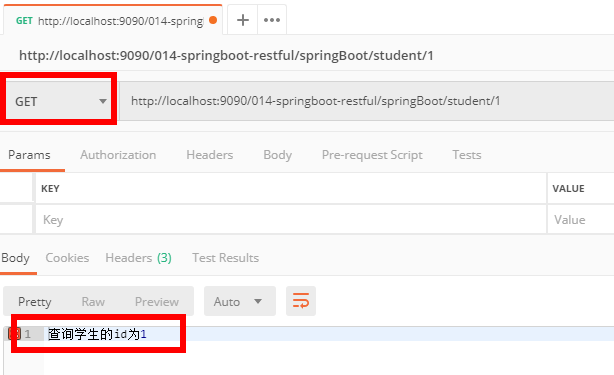
(4)请求冲突的问题
** 解决方案:<1>修改路径 <2>修改请求方式**
创建 RESTfulController 类,结合 Postman 进行测试说明 :
1. @RestController
2. public class RESTfulController {
3.
4. /**
5. * id:订单标识
6. * status:订单状态
7. * 请求路径:
8. http://localhost:9090/015-springboot-restful-url-conflict/springBoot/orde
9. r/1/1001
10. * @param id
11. * @param status
12. * @return
13. */
14. @GetMapping(value = "/springBoot/order/{id}/{status}")
15. public Object queryOrder(@PathVariable("id") Integer id, @PathVariable("status") Integer status) {
16.
17. Map<String,Object> map = new HashMap<String,Object>();
18.
19. map.put("id",id);
20. map.put("status",status);
21.
22. return map;
23. }
24.
25. /**
26. * id:订单标识
27. * status:订单状态
28. * 请求路径:
29. http://localhost:9090/015-springboot-restful-url-conflict/springBoot/1/or
30. der/1001
31. * @param id
32. * @param status
33.
34. * @return
35. */
36. @GetMapping(value = "/springBoot/{id}/order/{status}")
37. public Object queryOrder1(@PathVariable("id") Integer id, @PathVariable("status") Integer status) {
38. Map<String,Object> map = new HashMap<String,Object>();
39.
40. map.put("id",id);
41. map.put("status",status);
42.
43. return map;
44. }
45.
46. /**
47. * id:订单标识
48. * status:订单状态
49. * 请求路径:
50. http://localhost:9090/015-springboot-restful-url-conflict/springBoot/1001
51. /order/1
52. * @param id
53. * @param status
54. * @return
55. */
56. @GetMapping(value = "/springBoot/{status}/order/{id}")
57. public Object queryOrder2(@PathVariable("id") Integer id,
58. @PathVariable("status") Integer status) {
59. Map<String,Object> map = new HashMap<String,Object>();
60.
61. map.put("id",id);
62. map.put("status",status);
63.
64. return map;
65. }
66.
67. /**
68. * id:订单标识
69. * status:订单状态
70. * 请求路径:
71. http://localhost:9090/015-springboot-restful-url-conflict/springBoot/1001
72. /order/1
73. * @param id
74. * @param status
75. * @return
76. */
77.
78.
79. @PostMapping(value = "/springBoot/{status}/order/{id}")
80. public Object queryOrder3(@PathVariable("id") Integer id, @PathVariable("status") Integer status) {
81. Map<String,Object> map = new HashMap<String,Object>();
82.
83. map.put("id",id);
84. map.put("status",status);
85.
86. return map;
87. }
88.
89.
90.
91.
92. /**
93. * query1 和 query2 两个请求路径会发生请求路径冲突问题
94. * query3 与 query1 和 query2 发生请求冲突
95. * 注意:虽然两个路径写法改变了,但是由于传递的两个参数都是 int 值,所以不知道该交给
96. 哪个请求进行处理
97. * 就会出现匹配模糊不清的异常,所以要想解决冲突,有两种方式:
98. * 1.修改请求路径
99. * 2.修改请求方式
100. */
101. }
(5)RESTful 原则

-
分页、排序等操作,不需要使用斜杠传参数















3.6 Spring Boot 集成 Redis
完善根据学生 id 查询学生的功能: **先从 redis 缓存中查找,如果找不到,再从数据库中
查找,然后放到 redis 缓存中。**
具体实现步骤:
(A)首先通过 MyBatis 逆向工程生成实体 bean 和数据持久层 :

(B)在 pom.xml 文件中添加 redis 依赖
      1. <!-- 加载 spring boot redis 包 -->

  2. <dependency>

  3.  <groupId>org.springframework.boot</groupId>

  4.  <artifactId>spring-boot-starter-data-redis</artifactId>

  5. </dependency>
(C)Spring Boot 核心配置文件application.properties 如下:
      1. #配置内嵌 Tomcat 端口号

  2. server.port=9090

  3.

  4. #配置项目上下文根

  5. server.servlet.context-path=/016-springboot-redis

  6.

  7. #配置连接 MySQL 数据库信息

  8. spring.datasource.url=jdbc:mysql://127.0.0.1:3306/springboot?useUnicode=true&characterEncoding=UTF8&useJDBCCompliantTimezoneShift=true&useLegacyDa

  9. tetimeCode=false&serverTimezone=GMT%2B8

  10. spring.datasource.driver-class-name=com.mysql.cj.jdbc.Driver

  11. spring.datasource.username=root

  12. spring.datasource.password=root

  13.

  14. #配置 redis 连接信息

  15. spring.redis.host=127.0.0.1

  16. spring.redis.port=6379

  17. #spring.redis.password=root
(D)启动redis服务
(E)RedisController类
      1. @RestController

  2. public class RedisController {

  3.

  4.  @Autowired

  5.  private StudentService studentService;

  6.

  7.  /**

  8.  * 请求地址:

  9. http://localhost:9090/016-springboot-redis//springboot/allStudentCount

  10.  * @param request

  11.  * @return

  12.  */

  13.  @GetMapping(value = "/springboot/allStudentCount")

  14.  public Object allStudentCount(HttpServletRequest request) {

  15.

  16.  Long allStudentCount = studentService.queryAllStudentCount();

  17.

  18.  return "学生总人数:" + allStudentCount;

  19.  }

  20. }
(F)StudentService 接口
      1. public interface StudentService {

  2.

  3.  /**

  4.  * 获取学生总人数

  5.  * @return

  6.  */

  7.  Long queryAllStudentCount();

  8. }
(G)在 StudentServiceImpl 中注入 RedisTemplate,并编写根据 id获取学生的方法
    配置了上面的步骤,Spring Boot 将自动配置 RedisTemplate,在需要操作 redis 的类中注入 redisTemplate 即可。
    注意:Spring Boot 帮我们注入 RedisTemplate 类,泛型里面只能写 <String, String>、<Object, Object>或者什么都不写。

      1. @Service

  2. public class StudentServiceImpl implements StudentService {

  3.

  4.  @Autowired

  5.  private StudentMapper studentMapper;

  6.

  7.  @Autowired

  8.  private RedisTemplate<Object,Object> redisTemplate;

  9.

  10.  @Override

  11.  public Long queryAllStudentCount() {

  12.

  13.  //设置 redisTemplate 对象 key 的序列化方式

  14.  redisTemplate.setKeySerializer(new StringRedisSerializer());

  15.

  16.  //从 redis 缓存中获取总人数

  17.  Long allStudentCount = (Long) redisTemplate.opsForValue().get("allStudentCount");

  18.  //判断是否为空

  19.  if ( allStudentCount==null) {

  20.  //去数据库查询,并存放到 redis 缓存中

  21.

  22.  allStudentCount = studentMapper.selectAllStudentCount();

  23.

  24. redisTemplate.opsForValue().set("allStudentCount",allStudentCount,15,TimeUnit.SECONDS);

  25.  }

  26.  return allStudentCount;

  27.  }

  28. }
(H)StudentMapper 接口
      1. @Mapper

  2. public interface StudentMapper {

  3.  /**

  4.  * 获取学生总人数

  5.  * @return

  6.  */

  7.  Long selectAllStudentCount();

  8. }
**(I)StudentMapper 映射文件 **
      1. <!--获取学生总人数-->

  2. <select id="selectAllStudentCount" resultType="java.lang.Long">

  3.  select count(*) from  t_student

  4. </select>
(J)启动类 Application
在 SpringBoot 启动类上 添加扫描数据持久层的注解并指定扫描包:
      1. @SpringBootApplication

  2. @MapperScan(basePackages = "com.abc.springboot.mapper")//扫描数据持久层

  3. public class Application {

  4.

  5.  public static void main(String[] args) {

  6.  SpringApplication.run(Application.class, args);

  7.  }

  8.

  9. }
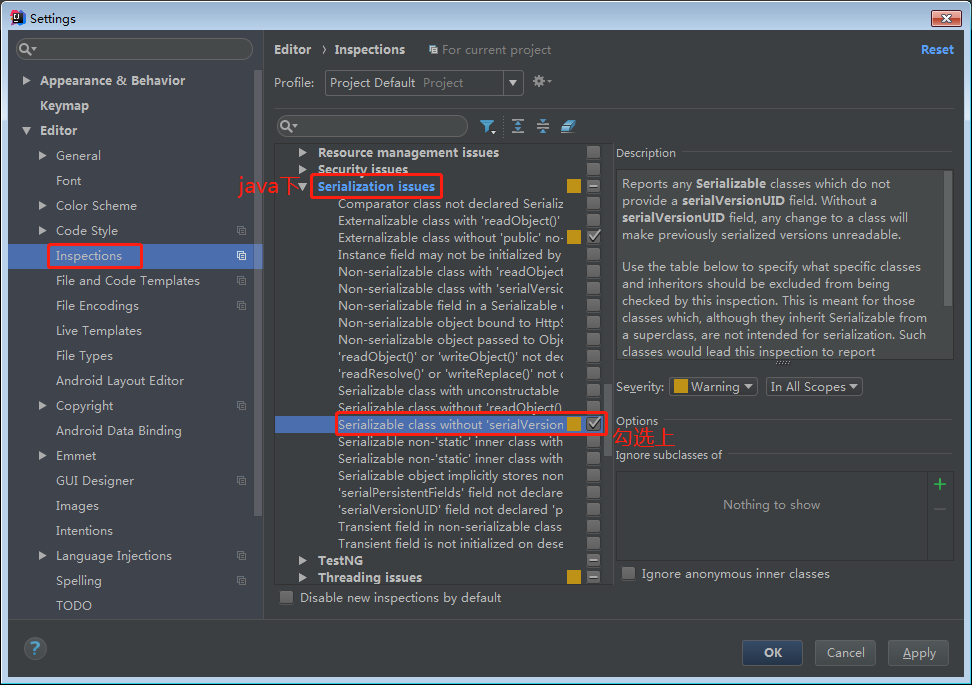
(K)让 Student 类实现序列化接口(可选)
在类名上 Alt + 回车 ,如果没有提示生成序列化 id,那么需要做如下的配置 :



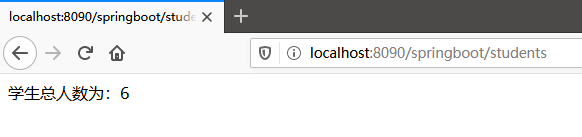
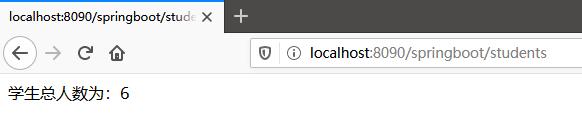
(L)启动 SpringBoot 应用,访问测试
文章知识点与官方知识档案匹配,可进一步学习相关知识