
Spring Boot自动配置原理
自动配置原理
SpringBoot实现自动配置原理图解:
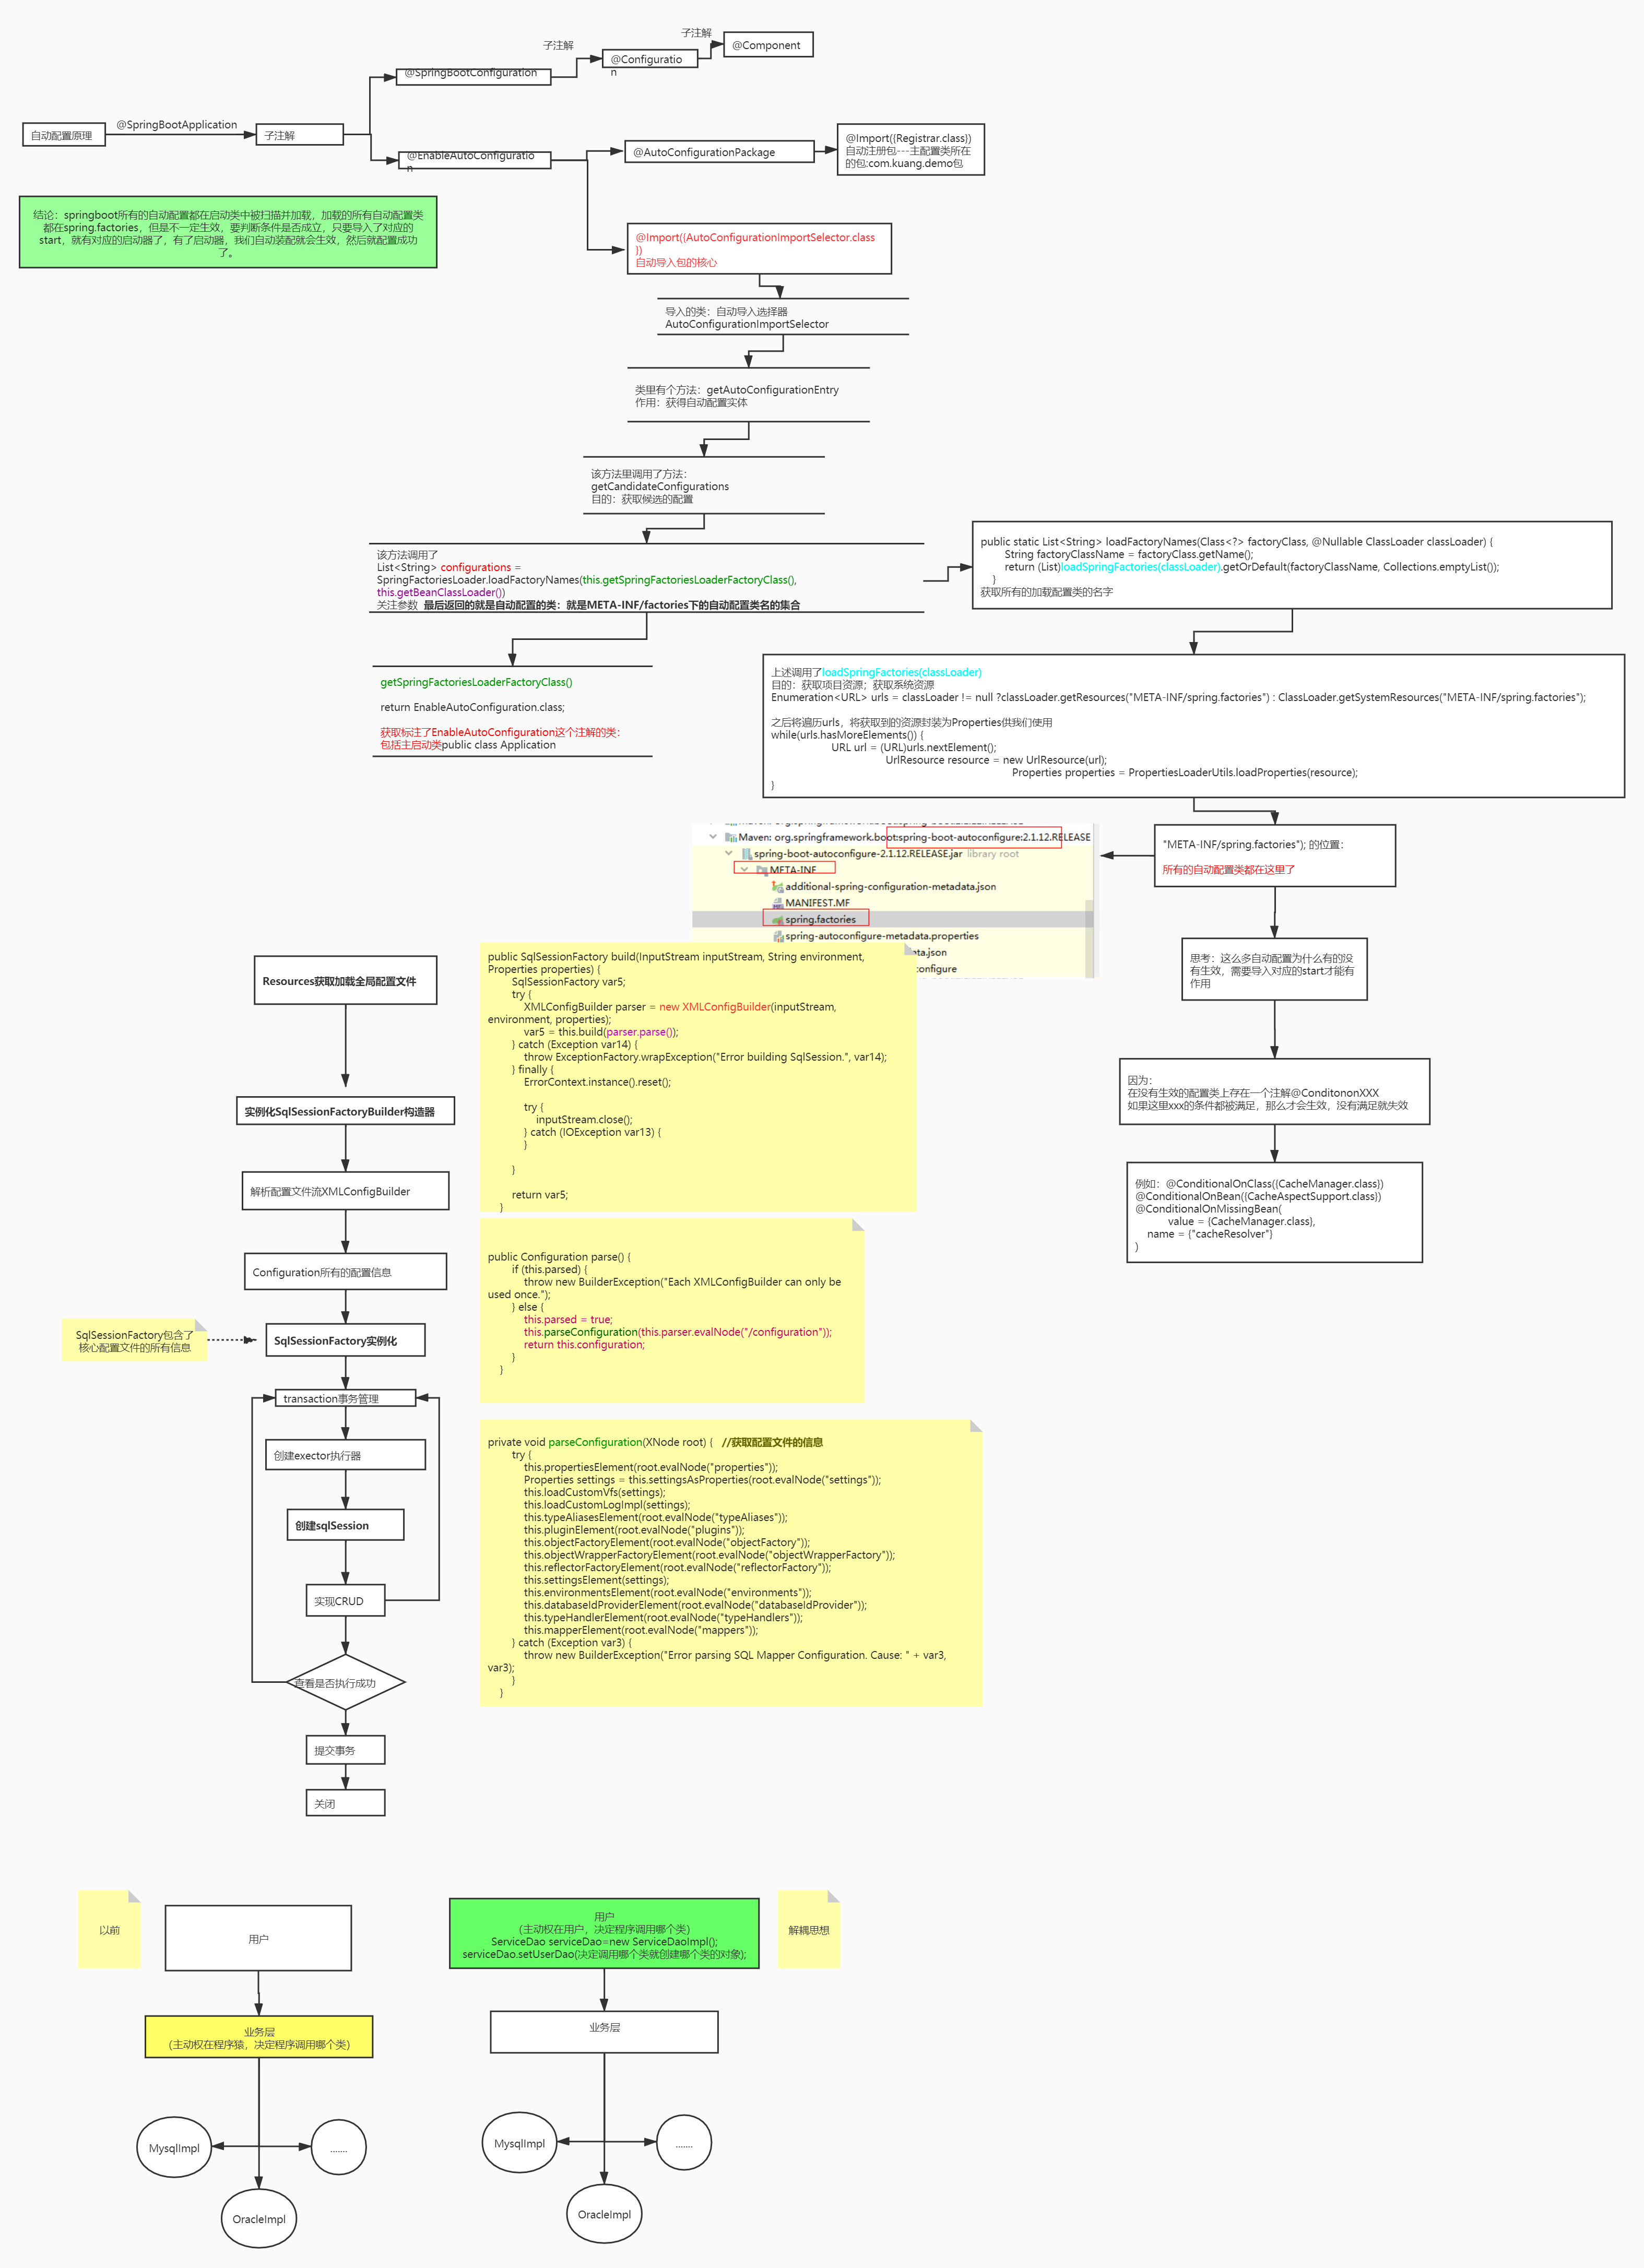
在 application.properties 中设置属性 debug=true,可以在控制台查看已启用和未启用的自动配置。
@SpringBootApplication是@Configuration、@EnableAutoConfiguration和@ComponentScan的组合。
@Configuration表示该类是Java配置类。
@ComponentScan开启自动扫描符合条件的bean(添加了@Controller、@Service等注解)。
@EnableAutoConfiguration会根据类路径中的jar依赖为项目进行自动配置,比如添加了spring-boot-starter-web依赖,会自动添加Tomcat和Spring MVC的依赖,然后Spring Boot会对Tomcat和Spring MVC进行自动配置(spring.factories EnableAutoConfiguration配置了WebMvcAutoConfiguration)。
@Target(ElementType.TYPE) @Retention(RetentionPolicy.RUNTIME) @Documented @Inherited @AutoConfigurationPackage @Import(EnableAutoConfigurationImportSelector.class) public @interface EnableAutoConfiguration { }
EnableAutoConfiguration主要由 @AutoConfigurationPackage,@Import(EnableAutoConfigurationImportSelector.class)这两个注解组成的。
@AutoConfigurationPackage用于将启动类所在的包里面的所有组件注册到spring容器。
@Import 将EnableAutoConfigurationImportSelector注入到spring容器中,EnableAutoConfigurationImportSelector通过SpringFactoriesLoader从类路径下去读取META-INF/spring.factories文件信息,此文件中有一个key为org.springframework.boot.autoconfigure.EnableAutoConfiguration,定义了一组需要自动配置的bean。
# Auto Configure org.springframework.boot.autoconfigure.EnableAutoConfiguration=\ org.springframework.boot.autoconfigure.admin.SpringApplicationAdminJmxAutoConfiguration,\ org.springframework.boot.autoconfigure.aop.AopAutoConfiguration,\ org.springframework.boot.autoconfigure.amqp.RabbitAutoConfiguration,\ org.springframework.boot.autoconfigure.batch.BatchAutoConfiguration,\ org.springframework.boot.autoconfigure.cache.CacheAutoConfiguration,\
这些配置类不是都会被加载,会根据xxxAutoConfiguration上的@ConditionalOnClass等条件判断是否加载,符合条件才会将相应的组件被加载到spring容器。(比如mybatis-spring-boot-starter,会自动配置sqlSessionFactory、sqlSessionTemplate、dataSource等mybatis所需的组件)
@Configuration @ConditionalOnClass({ EnableAspectJAutoProxy.class, Aspect.class, Advice.class, AnnotatedElement.class }) //类路径存在EnableAspectJAutoProxy等类文件,才会加载此配置类 @ConditionalOnProperty(prefix = "spring.aop", name = "auto", havingValue = "true", matchIfMissing = true) public class AopAutoConfiguration { @Configuration @EnableAspectJAutoProxy(proxyTargetClass = false) @ConditionalOnProperty(prefix = "spring.aop", name = "proxy-target-class", havingValue = "false", matchIfMissing = false) public static class JdkDynamicAutoProxyConfiguration { } @Configuration @EnableAspectJAutoProxy(proxyTargetClass = true) @ConditionalOnProperty(prefix = "spring.aop", name = "proxy-target-class", havingValue = "true", matchIfMissing = true) public static class CglibAutoProxyConfiguration { } }
全局配置文件中的属性如何生效,比如:server.port=8081,是如何生效的?
@ConfigurationProperties的作用就是将配置文件的属性绑定到对应的bean上。全局配置的属性如:server.port等,通过@ConfigurationProperties注解,绑定到对应的XxxxProperties bean,通过这个 bean 获取相应的属性(serverProperties.getPort())。
//server.port = 8080 @ConfigurationProperties(prefix = "server", ignoreUnknownFields = true) public class ServerProperties { private Integer port; private InetAddress address; @NestedConfigurationProperty private final ErrorProperties error = new ErrorProperties(); private Boolean useForwardHeaders; private String serverHeader; //... }
实现自动配置
实现当某个类存在时,自动配置这个类的bean,并且可以在application.properties中配置bean的属性。
(1)新建Maven项目spring-boot-starter-hello,修改pom.xml如下:
<?xml version="1.0" encoding="UTF-8"?> <project xmlns="http://maven.apache.org/POM/4.0.0" xmlns:xsi="http://www.w3.org/2001/XMLSchema-instance" xsi:schemaLocation="http://maven.apache.org/POM/4.0.0 http://maven.apache.org/xsd/maven-4.0.0.xsd"> <modelVersion>4.0.0</modelVersion> <groupId>com.tyson</groupId> <artifactId>spring-boot-starter-hello</artifactId> <version>1.0-SNAPSHOT</version> <dependencies> <dependency> <groupId>org.springframework.boot</groupId> <artifactId>spring-boot-autoconfigure</artifactId> <version>1.3.0.M1</version> </dependency> <dependency> <groupId>junit</groupId> <artifactId>junit</artifactId> <version>3.8.1</version> </dependency> </dependencies> </project>
(2)属性配置
public class HelloService { private String msg; public String getMsg() { return msg; } public void setMsg(String msg) { this.msg = msg; } public String sayHello() { return "hello" + msg; } } import org.springframework.boot.context.properties.ConfigurationProperties; @ConfigurationProperties(prefix="hello") public class HelloServiceProperties { private static final String MSG = "world"; private String msg = MSG; public String getMsg() { return msg; } public void setMsg(String msg) { this.msg = msg; } }
(3)自动配置类
import com.tyson.service.HelloService; import org.springframework.beans.factory.annotation.Autowired; import org.springframework.boot.autoconfigure.condition.ConditionalOnClass; import org.springframework.boot.autoconfigure.condition.ConditionalOnMissingBean; import org.springframework.boot.autoconfigure.condition.ConditionalOnProperty; import org.springframework.boot.context.properties.EnableConfigurationProperties; import org.springframework.context.annotation.Bean; import org.springframework.context.annotation.Configuration; @Configuration @EnableConfigurationProperties(HelloServiceProperties.class) //1 @ConditionalOnClass(HelloService.class) //2 @ConditionalOnProperty(prefix="hello", value = "enabled", matchIfMissing = true) //3 public class HelloServiceAutoConfiguration { @Autowired private HelloServiceProperties helloServiceProperties; @Bean @ConditionalOnMissingBean(HelloService.class) //4 public HelloService helloService() { HelloService helloService = new HelloService(); helloService.setMsg(helloServiceProperties.getMsg()); return helloService; } }
-
@EnableConfigurationProperties 注解开启属性注入,将带有@ConfigurationProperties 注解的类注入为Spring 容器的 Bean。
-
当 HelloService 在类路径的条件下。
-
当设置 hello=enabled 的情况下,如果没有设置则默认为 true,即条件符合。
-
当容器没有这个 Bean 的时候。
(4)注册配置
想要自动配置生效,需要注册自动配置类。在 src/main/resources 下新建 META-INF/spring.factories。添加以下内容:
org.springframework.boot.autoconfigure.EnableAutoConfiguration=\ com.tyson.config.HelloServiceAutoConfiguration
"\"是为了换行后仍然能读到属性。若有多个自动配置,则用逗号隔开。
(5)使用starter
在 Spring Boot 项目的 pom.xml 中添加:
<dependency> <groupId>com.tyson</groupId> <artifactId>spring-boot-starter-hello</artifactId> <version>1.0-SNAPSHOT</version> </dependency>
运行类如下:
import com.tyson.service.HelloService; import org.springframework.beans.factory.annotation.Autowired; import org.springframework.boot.SpringApplication; import org.springframework.boot.autoconfigure.SpringBootApplication; import org.springframework.web.bind.annotation.RequestMapping; import org.springframework.web.bind.annotation.RestController; @RestController @SpringBootApplication public class SpringbootDemoApplication { @Autowired public HelloService helloService; @RequestMapping("/") public String index() { return helloService.getMsg(); } public static void main(String[] args) { SpringApplication.run(SpringbootDemoApplication.class, args); } }
在项目中没有配置 HelloService bean,但是我们可以注入这个bean,这是通过自动配置实现的。
在 application.properties 中添加 debug 属性,运行配置类,在控制台可以看到:
HelloServiceAutoConfiguration matched: - @ConditionalOnClass found required class 'com.tyson.service.HelloService' (OnClassCondition) - @ConditionalOnProperty (hello.enabled) matched (OnPropertyCondition) HelloServiceAutoConfiguration#helloService matched: - @ConditionalOnMissingBean (types: com.tyson.service.HelloService; SearchStrategy: all) did not find any beans (OnBeanCondition)
可以在 application.properties 中配置 msg 的内容:
hello.msg=lily