
为什么使用nuxt.js?nuxt.js使用详解
概述
为什么使用nuxt.js?
vue单页面应用渲染是从服务器获取所需js,在客户端将其解析生成html挂载于 id为app的DOM元素上,这样会存在两大问题。
- 由于资源请求量大,造成网站首屏加载缓慢,不利于用户体验。
- 由于页面内容通过js插入,对于内容性网站来说,搜索引擎无法抓取网站内容,不利于SEO。 Nuxt.js 是一个基于Vue.js的通用应用框架,预设了利用Vue.js开发服务端渲染的应用所需要的各种配置。可以将html在服务端渲染,合成完整的html文件再输出到浏览器。
创建项目
确保已安装npx(自npm 5.2.0起默认安装npx)或npm v6.1或yarn。
npx create-nuxt-app <project-name>
目录结构
- pages 目录包含应用程序的视图和路由
- components 组件目录包含您的Vue.js组件。组件是构成页面不同部分的元素,可以重复使用并导入到页面,布局甚至其他组件中
- 要从组件中的API访问异步数据,可以使用Nuxt
fetch()hook,通过检查$fetchState.pending,我们可以在等待数据加载时显示一条消息。我们也可以检查$fetchState.error并显示一条错误消息,如果获取数据时出错。使用时fetch(),我们必须在中声明适当的属性data()。然后可以将来自提取的数据分配给这些属性。
<template> <div> <p v-if="$fetchState.pending">Loading....</p> <p v-else-if="$fetchState.error">Error while fetching mountains</p> <ul v-else> <li v-for="(mountain, index) in mountains" :key="index"> {{ mountain.title }} </li> </ul> </div> - 要从组件中的API访问异步数据,可以使用Nuxt
```
- 组件发现
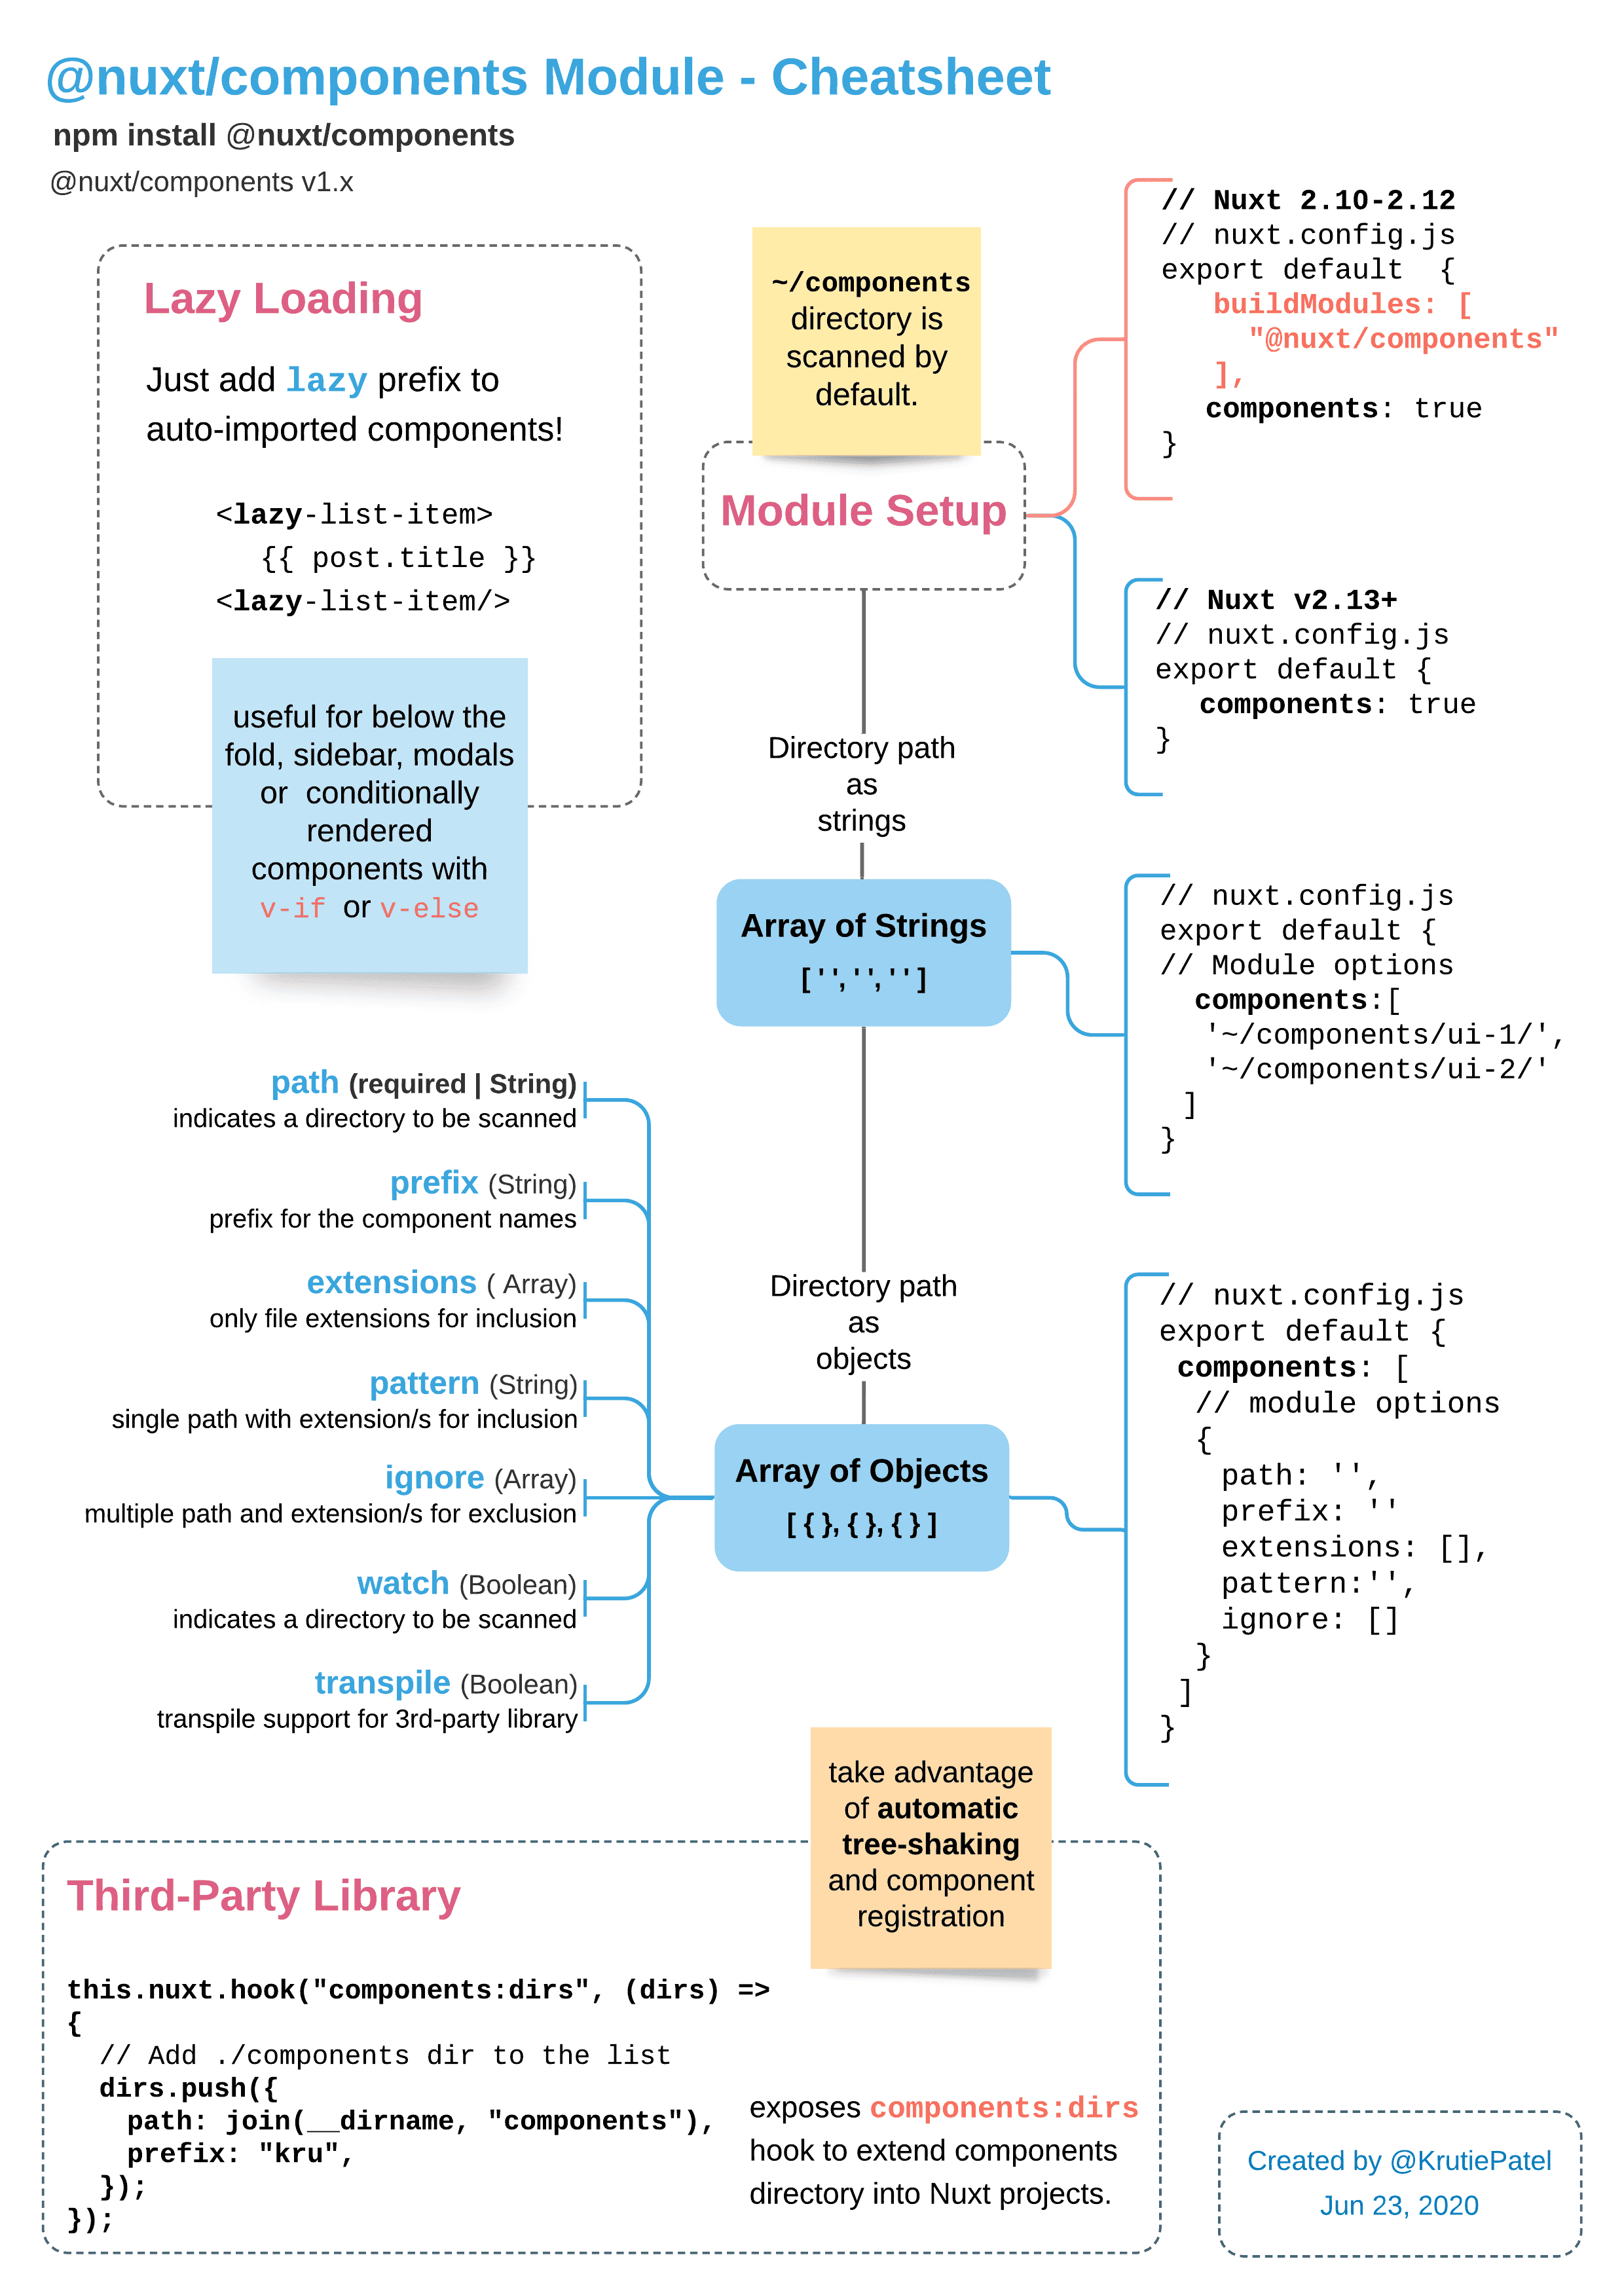
- 从开始v2.13,Nuxt可以在模板中使用时自动导入您的组件。要激活此功能,请components: true在您的配置中进行设置:
nuxt.config.js

 export default {
   components: true
}
- 在components目录中创建组件后,即可将其自动导入。
components/
TheHeader.vue
TheFooter.vue
default.vue
<template>
   <div>
     <TheHeader />
       <Nuxt />
     <TheFooter />
   </div>
</template>
- assets 目录包含您的未编译资源,例如样式,图像或字体
- 在vue 模板内部 ,如果需要链接到 assets 目录~/assets/your_image.png,请在资产前使用斜杠。
<template> <img src="~/assets/your_image.png" /> </template>- 在css 文件内部 ,如果需要引用 assets 目录,请使用~assets/your_image.png(不带斜杠)
background: url('~assets/banner.svg');- 使用动态图像时,您将需要使用require
<img :src="require(`~/assets/img/${image}.jpg`)" />- 如果要使用 sass ,请确保已安装sass 并 安装了 sass-loader 软件包。
npm install --save-dev sass sass-loader@10 fibers - static 目录直接映射到服务器根目录,并且包含必须保留其名称(例如robots.txt)或可能不会更改(例如favicon)的文件
- layouts 当您想改变Nuxt应用程序的外观时,布局是一个很大的帮助。您是否要包含侧边栏或具有针对移动设备和台式机的独特布局
- 您可以在此处添加更多组件,例如导航,页眉,页脚等。,当在模板中使用Nuxt时,它可以自动导入您的组件。要激活此功能,请在您的配置中进行设置:
<template>
   <div>
     <TheHeader />
       <Nuxt />
     <TheFooter />
   </div>
```
- 自定义布局,目录中的每个文件() 都将创建一个自定义布局,可使用 页面组件中的属性进行访问 。layouts/blog.vue:
 <template>
     <div>
       <div>My blog navigation bar here</div>
       <Nuxt />
     </div>
</template>
假设我们要创建一个博客布局并将其保存到 :
<script>
export default {
  layout: 'blog',
  // OR
  layout (context) {
    return 'blog'
  }
}
</script>
base/
    foo/
       Button.vue
- 错误页面是一个 ,在发生错误时始终显示该 页面(不会在服务器端抛出)。layouts/error.vue 文件,错误页面,您可以通过添加 文件来自定义错误页面 :页面组件 ,该组件在发生错误时始终显示(未在服务器端抛出)。然后,您必须告诉页面使用自定义布局 在其模板中。必须看到这布局发生错误时(一个组件显示404, 500等)。与其他页面组件类似,您也可以使用通常的方式为错误页面设置自定义布局。
<template>
 <div class="container">
     <h1 v-if="error.statusCode === 404">Page not found</h1>
     <h1 v-else>An error occurred</h1>
     <NuxtLink to="/">Home page</NuxtLink>
 </div>
</template>
<script>
   export default {
     props: ['error'],
     layout: 'blog' // you can set a custom layout for the error page
   }
</script>
- nuxt.config.js 文件是Nuxt.js的单点配置。如果要添加模块或覆盖默认设置,则可以在此处应用更改
- package.json 文件包含应用程序的所有依赖关系和脚本。
生命周期
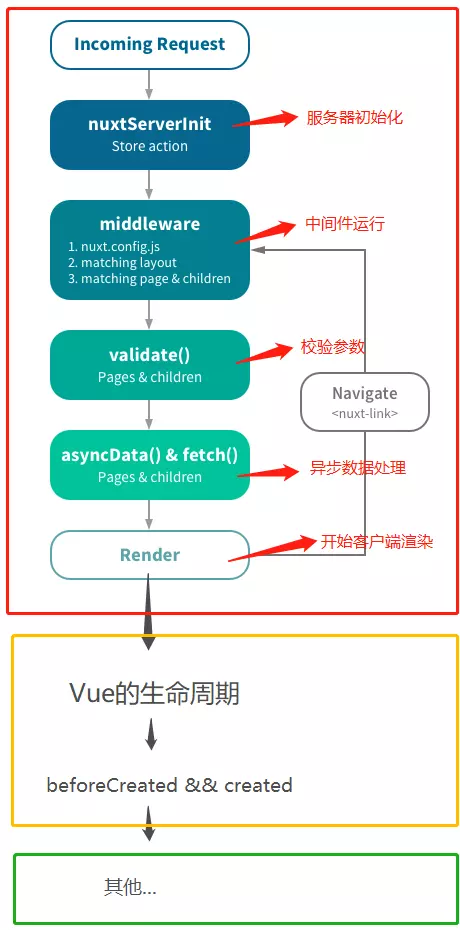
以上是 nuxt.js 的生命周期流程图,红框内的是Nuxt 的生命周期(运行在服务端),黄框内同时运行在服务端&&客户端上,绿框内则运行在客户端
因为 红框、黄框内的周期都不存在Window对象,所以不能直接使用window
<script>
export default {
 asyncData() {
   console.log(window) // 服务端报错
 },
 fetch() {
   console.log(window) // 服务端报错
 },
 created () {
   console.log(window) // undefined
 },
 mounted () {
   console.log(window) // Window {postMessage: ƒ, blur: ƒ, focus: ƒ, close: ƒ, frames: Window, …}
 }
}
</script>
下面详细讲一下每个钩子函数执行情况:
incoming request
这个阶段是服务器收到请求,开始走流程
nuxtServerInit
- 1.服务器初始化
- 2.只能够在store/index.js中使用
- 3.用于在渲染页面之前存储数据到vuex中
例子
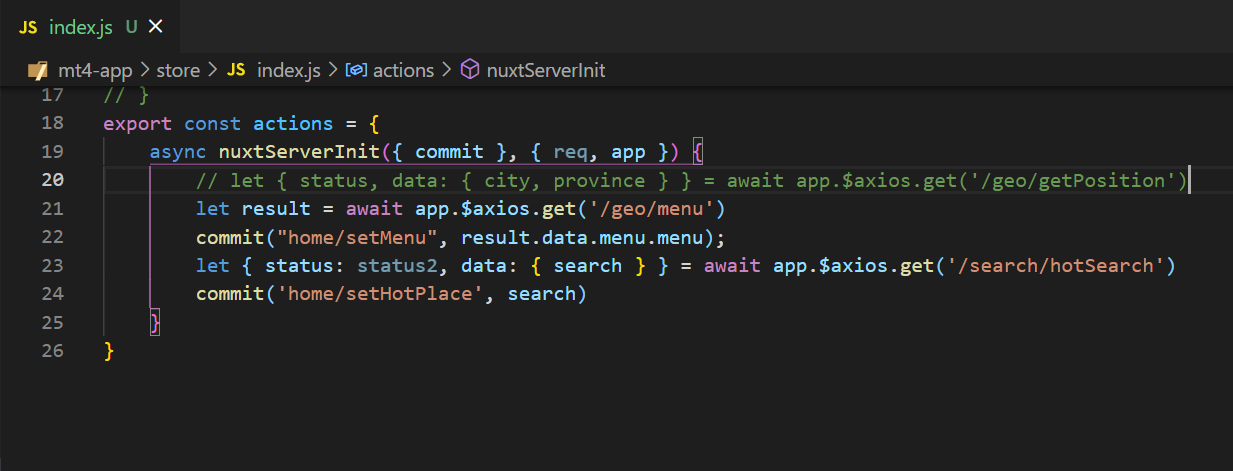
参数: 第一个参数是:vuex上下文 第二个参数是:Nuxt上下文
middleware
这个阶段会执行一些预定义的中间件,自己定义的中间件也会在这个阶段执行
validate
可以让你在动态路由对应的页面组件中配置一个校验方法用于校验动态路由参数的有效性。(具体实现请参考官方文档)
asyncData
这个方法可以使得你能够在渲染组件之前异步获取数据。好比你在vue组件中用created获取数据一样,不同的是asyncData是在服务端执行的 还有要注意的是:asyncData只是在首屏的时候调用一次(即页面渲染之前,所以事件触发不了它)
fetch
fetch 方法用于在渲染页面前填充应用的状态树(store)数据, 与 asyncData 方法类似,不同的是它不会设置组件的数据。 如果页面组件设置了 fetch 方法,它会在组件每次加载前被调用(在服务端或切换至目标路由之前)。 fetch 方法的第一个参数是页面组件的上下文对象 context,我们可以用 fetch 方法来获取数据填充应用的状态树。为了让获取过程可以异步,你需要返回一个 Promise,Nuxt.js 会等这个 promise 完成后再渲染组件。 注意,在fetch阶段是无法使用this获取组件实例,fetch是在组件初始化之前被调用(好像fetch函数也会在created和beforeMount之间执行一次)
<template>
  <h1>Stars: {{ $store.state.stars }}</h1>
</template>

<script>
  export default {
    fetch({ store, params }) {
      return axios.get('http://my-api/stars').then(res => {
        store.commit('setStars', res.data)
      })
    }
  }
</script>
如果要在fetch中调用并操作store,请使用store.dispatch,但是要确保在内部使用async / await等待操作结束:
<script>
  export default {
    async fetch({ store, params }) {
      await store.dispatch('GET_STARS')
    }
  }
</script>
render
这个阶段开始准备客户端渲染,如果过程中有通过nuxt-link跳转,会退回至middleware阶段重新执行
beforeCreat和created阶段
这个和vue中的钩子函数功能基本类似,有一个小的差别,vue的这两个钩子只在客户端执行,nuxt的这两个钩子在客户端和服务端都会执行一遍
其他阶段
之后的阶段都是在客户端中执行,比如beforeMount和mounted阶段等等
配置
Nuxt.js 默认的配置涵盖了大部分使用情形,可通过 nuxt.config.js 来覆盖默认的配置。
build
Nuxt.js 允许你在自动生成的 vendor.bundle.js 文件中添加一些模块,以减少应用 bundle 的体积。如果你的应用依赖第三方模块,这个配置项是十分实用的。
css
该配置项用于定义应用的全局(所有页面均需引用的)样式文件、模块或第三方库。
dev
该配置项用于配置 Nuxt.js 应用是开发还是生产模式。 关于 dev 配置项的详细文档
env
该配置项用于定义应用客户端和服务端的环境变量。
generate
该配置项用于定义每个动态路由的参数,Nuxt.js 依据这些路由配置生成对应目录结构的静态文件。
head
该配置项用于配置应用默认的 meta 标签。
loading
该配置项用于个性化定制 Nuxt.js 使用的加载组件。
modules
该配置项允许您将 Nuxt 模块添加到项目中。
modulesDir
该配置项允许您定义Nuxt.js应用程序的node_modules文件夹。 关于 modulesDir 配置项的详细文档
plugins
该配置项用于配置那些需要在 根vue.js应用 实例化之前需要运行的 Javascript 插件。
rootDir
该配置项用于配置 Nuxt.js 应用的根目录。
关于 rootDir 配置项的详细文档 关于 build 配置项的详细文档
router
该配置项可用于覆盖 Nuxt.js 默认的 vue-router 配置。
server
此选项允许您配置 Nuxt.js 应用程序的服务器实例变量。
srcDir
该配置项用于配置应用的源码目录路径。
dir
此选项允许您配置 Nuxt.js 应用程序的自定义目录。
Documentation about dir integration
transition
该配置项用于个性化配置应用过渡效果属性的默认值。
示例
const webpack = require('webpack')
export default {
    // Global page headers: https://go.nuxtjs.dev/config-head
    head: {
        htmlAttrs: {
            lang: 'en'
        },
        meta: [
            { charset: 'utf-8' },
            { name: 'viewport', content: 'width=device-width,initial-scale=1.0, minimum-scale=1.0, maximum-scale=1.0, user-scalable=no' },
            { hid: 'description', name: 'description', content: '' }
        ],
        link: [
            { rel: 'icon', type: 'image/x-icon', href: '/favicon.ico' }
        ]
    },

    // Global CSS: https://go.nuxtjs.dev/config-css
    css: [
        'view-design/dist/styles/iview.css',
        '@/icon/iconfont.css',
        'element-ui/lib/theme-chalk/index.css',
        '@/assets/stylus/index.styl',
        '@/assets/stylus/article.css',
        '@/assets/stylus/article.styl',
        '@/assets/stylus/main.css',
        '@/assets/stylus/theme.styl',
        '@/assets/stylus/mixin.styl',
        '@/assets/stylus/index.css',
        '@/assets/stylus/base.styl',
        'mavon-editor/dist/css/index.css',
        'babel-polyfill',
        'viewerjs/dist/viewer.css',
        '@/assets/css/main.css',
        'vue-social-share/dist/client.css'
    ],

    // Plugins to run before rendering page: https://go.nuxtjs.dev/config-plugins
    plugins: [{
            src: '@/plugins/view-ui',
            //是否需要服务端熏染
            ssr: true,
        }, {
            src: '~/icon/iconfont.js',
            //是否需要服务端熏染
            ssr: false,
        }, //elementui
        {
            src: '@/plugins/element-ui',
            //是否需要服务端熏染
            ssr: true,
        }
        //引入jquery的爱心js
        , {
            src: '@/assets/js/love',
            //是否需要服务端熏染
            ssr: false,
        }, {
            //mavon-editor 富文本编辑器
            src: '@/plugins/mavon-editor',
            //是否需要服务端熏染
            ssr: true,
        },
        //wangeditor
        { src: '@/plugins/wangeditor', ssr: false },
        {
            src: '@/plugins/vue-particles',
            //是否需要服务端熏染
            ssr: false,
        }, {
            //兼容ie
            src: '@/plugins/hls',
            //是否需要服务端熏染
            ssr: false,
        },
        {
            //移动端手指滑动监控插件
            src: '@/plugins/vue-touch',
            //是否需要服务端熏染
            ssr: false,
        }, {
            //滑动验证码
            src: '@/plugins/vue-monoplasty-slide-verify',
            //是否需要服务端熏染
            ssr: true,
        }, {
            //图片预览插件
            src: '@/plugins/v-viewer',
            //是否需要服务端熏染
            ssr: true,
        }, {
            //axios
            src: "~/plugins/axios",
            ssr: true
        }, {
            //分享插件
            src: "~/plugins/vue-social-share",
            ssr: false
        },
        //配置路由守卫
        { src: '@/plugins/permission', ssr: true },
        { src: '@/plugins/vue-video-player', ssr: false },
        { src: '@/plugins/vue-aplayer', ssr: false },
    ],
    //设置接口地址环境变量
    env: {
        baseUrl: process.env.BASE_URL
    },
    // Auto import components: https://go.nuxtjs.dev/config-components
    components: true,

    // Modules for dev and build (recommended): https://go.nuxtjs.dev/config-modules
    buildModules: [],

    // Modules: https://go.nuxtjs.dev/config-modules
    modules: [
        //cookie
        'cookie-universal-nuxt',
        //axios
        '@nuxtjs/axios',
    ],
    //路由进度条配置
    loading: {
        color: '#19be6b',
    },
    // Build Configuration: https://go.nuxtjs.dev/config-build
    build: {
        //使用jquery
        plugins: [
            new webpack.ProvidePlugin({ jQuery: "jquery", $: "jquery" })
        ],
    },
}
nuxt全局接口地址配置
npm install cross-env -save
package.json文件修改配置(BASE_URL=测试域名或正式域名)
"scripts": {
        "dev": "cross-env BASE_URL=http://127.0.0.1:9000 nuxt",
        "build": "cross-env BASE_URL=https://xiyankt.com/xiyan nuxt build",
        "start": "cross-env BASE_URL=https://xiyankt.com/xiyan nuxt start",
        "generate": "cross-env BASE_URL=https://xiyankt.com/xiyan nuxt generate"
    },
nuxt.config.js文件添加env配置(env是environment环境的意思)
//设置接口地址环境变量
    env: {
        baseUrl: process.env.BASE_URL
    },
axios数据请求配置
npm install @nuxtjs/axios -d
plugins下面创建axios.js文件
export default function({ store, redirect, app: { $axios, $cookies } }) {

    // 数据访问前缀,指定配置的环境变量接口地址
    $axios.defaults.baseURL = process.env.baseUrl

    // request拦截器,我这里设置了一个token,当然你可以不要
    $axios.onRequest(config => {
        //请求超时时间
        config.timeout = 600000
        if ($cookies.get("token")) {
            //如果有toekn才携带请求头中的token到后端
            config.headers.common['x-access-token'] = $cookies.get("token")
        }
    })
    $axios.onError(error => {
            console.log(error.response);
            //异常处理逻辑,根据自己的实际情况进行判断
            if (error.response.status === 401) {
                redirect("/login")
                return Promise.reject(error);
            }
            return Promise.reject(error.response)
        })
        // response拦截器,数据返回后,你可以先在这里进行一个简单的判断
    $axios.interceptors.response.use(response => {
        return response
    })
}
nuxt.config.js 进行引入
 plugins: [{
        {
            //axios
            src: "~/plugins/axios",
            //是否需要服务端熏染
            ssr: true
        }
 }]
使用
async getList(param) {
      //设置Content-Type 为application/x-www-form-urlencoded 为了兼容苹果浏览器和ie浏览器
      let res = await this.$axios.post("/web/article/list", this.res, {
        headers: { "Content-Type": "application/x-www-form-urlencoded" },
      });
      this.articleList = res.voList;
      this.total = res.total;
    }
路由
Nuxt.js 依据 pages 目录结构自动生成 vue-router 模块的路由配置。
要在页面之间使用路由,我们建议使用 标签。
例如:
<template>
  <nuxt-link to="/">首页</nuxt-link>
</template>
基础路由
假设 pages 的目录结构如下:
pages/
--| user/
-----| index.vue
-----| one.vue
--| index.vue
那么,Nuxt.js 自动生成的路由配置如下:
router: {
  routes: [
    {
      name: 'index',
      path: '/',
      component: 'pages/index.vue'
    },
    {
      name: 'user',
      path: '/user',
      component: 'pages/user/index.vue'
    },
    {
      name: 'user-one',
      path: '/user/one',
      component: 'pages/user/one.vue'
    }
  ]
}
动态路由
在 Nuxt.js 里面定义带参数的动态路由,需要创建对应的以下划线作为前缀的 Vue 文件 或 目录。
以下目录结构:
pages/
--| _slug/
-----| comments.vue
-----| index.vue
--| users/
-----| _id.vue
--| index.vue
Nuxt.js 生成对应的路由配置表为:
router: {
  routes: [
    {
      name: 'index',
      path: '/',
      component: 'pages/index.vue'
    },
    {
      name: 'users-id',
      path: '/users/:id?',
      component: 'pages/users/_id.vue'
    },
    {
      name: 'slug',
      path: '/:slug',
      component: 'pages/_slug/index.vue'
    },
    {
      name: 'slug-comments',
      path: '/:slug/comments',
      component: 'pages/_slug/comments.vue'
    }
  ]
}
你会发现名称为 users-id 的路由路径带有 :id? 参数,表示该路由是可选的。如果你想将它设置为必选的路由,需要在 users/_id 目录内创建一个 index.vue 文件。
路由参数校验
Nuxt.js 可以让你在动态路由组件中定义参数校验方法。
举个例子: pages/users/_id.vue
export default {
  validate({ params }) {
    // 必须是number类型
    return /^\d+$/.test(params.id)
  }
}
如果校验方法返回的值不为 true或Promise中 resolve 解析为false或抛出 Error , Nuxt.js 将自动加载显示 404 错误页面或 500 错误页面。
想了解关于路由参数校验的信息,请参考 页面校验 API。
动态嵌套路由
这个应用场景比较少见,但是 Nuxt.js 仍然支持:在动态路由下配置动态子路由。
假设文件结构如下:
pages/
--| _category/
-----| _subCategory/
--------| _id.vue
--------| index.vue
-----| _subCategory.vue
-----| index.vue
--| _category.vue
--| index.vue
Nuxt.js 自动生成的路由配置如下:
router: {
  routes: [
    {
      path: '/',
      component: 'pages/index.vue',
      name: 'index'
    },
    {
      path: '/:category',
      component: 'pages/_category.vue',
      children: [
        {
          path: '',
          component: 'pages/_category/index.vue',
          name: 'category'
        },
        {
          path: ':subCategory',
          component: 'pages/_category/_subCategory.vue',
          children: [
            {
              path: '',
              component: 'pages/_category/_subCategory/index.vue',
              name: 'category-subCategory'
            },
            {
              path: ':id',
              component: 'pages/_category/_subCategory/_id.vue',
              name: 'category-subCategory-id'
            }
          ]
        }
      ]
    }
  ]
}
Vuex 状态树
Nuxt.js 会尝试找到 src 目录(默认是应用根目录)下的 store 目录,如果该目录存在,它将做以下的事情:
引用 vuex 模块 将 vuex 模块 加到 vendors 构建配置中去 设置 Vue 根实例的 store 配置项 Nuxt.js 支持两种使用 store 的方式,你可以择一使用:
export const state = () => ({
    token: '',
    user: "",
})

export const mutations = {
    // 用户登录时,需要设置用户信息
    setUserInfo(state, loginInfo) {
        state.token = loginInfo.token
        state.user = loginInfo.user
    },
    // 用户登出时,需要删除用户信息
    removeUserInfo(state) {
        state.token = ''
        state.user = ''
    }
}

export const actions = {
    //nuxtServerInit方法在每次发送请求且请求未到达页面的时候都会被调用,可以借助这个方法来设置Vuex。[注意此方法只会在store/index.js 固定的,如果是其它文件将不会执行]
    async nuxtServerInit({ commit }, { req, $cookies, $axios }) {
        //设置aes密钥
        await $axios.post("/web/aes/key").then((res) => {
            $cookies.set("key", res.key);
        });


        //持久化store
        if (req.headers.cookie) {
            // 切分Cookie
            const cookie = req.headers.cookie.split(';')
                // 定义字符常量:需要从cookie中取出的值的名称
            const tk = 'token='
            const u = 'user='

            // 需要持久化的值
            let token = ''
            let user = ''

            // 遍历Cookie,取得需要的值
            cookie.forEach((e) => {
                if (e.includes(tk)) {
                    token = e.split(tk)[1]
                } else if (e.includes(u)) {
                    user = e.split(u)[1]
                }
            })

            // 提交mutation
            commit('setUserInfo', {
                token,
                user,
            })
        }
    }
}